Friday 21 April 2017

Captain Poprocks' Australian Adventures


Hi there!

It is hard to believe, that we have been home in Germany for over four weeks now. Our time in Australia feels like yesterday and so long ago at the same time! So about time I show you some pictures and tell you a bit about our travels, don't you think?

I finally got to meet Captain Poprocks in person (eh.. in hippo). As he has traveled Australia quite a bit already, we were lucky that he offered to be our tour guide and show us around!


We spent the first week in Sydney with Michelle and her family. For the first weekend they took us to the holiday house at Lake Macquarie and my, we had a wonderful time there. The house turned out stunning (I had only seen pictures before!). It was so wonderful so start our time in Australia with the whole family and great summer weather. There were even kangaroos in the garden to greet us. After returning to Sydney, the husband and I wandered around the CBD and several suburbs. A lot has changed since I was there last (2011) and I am quite fond of the new district between the Rocks and Darling Harbour. I wasn't so fond of the huge, huge cruise ships at Circular Quay - there were always cruise ships around when I was in Sydney before but these new ones are soo big and take quite a bit of the view. Some of my former favourite places to sit aren't even accessible anymore.


Just a week after we arrived, we flew down to Melbourne. We spent the first three nights in St. Kilda which was really lovely. The weather was great and thus we could easily wander around Melbourne, look for the best coffee shops, eat good food and meet some penguins!


When we went to pick up our car rental, we were in for a shock: There was no booking in the system and thus no car! I had booked the car via one of the biggest German car rental homepages (Billiger Mietwagen) and had already paid for it. I wasn't happy and I have to confess lots of tears were involved. In the end, we had to hire another car and pay for it again. Took us half a day and so far (over four weeks later!), we haven't been refunded. As you might guess, I won't ever book a car through that agency again. I will wait for another two weeks and if nothing has happened by then, I guess we will have to involve a lawyer.


Once we had a car we drove to Rye at the Mornington Peninsula. As with all our accommodations in Victoria we had booked via AirBnB and this place was amazing! We just loved it there to pieces! We went on a tour to swim with dolphins and while none showed up the first time we went, a whole bunch came the second time! They didn't stay for long but it was magical nevertheless!


After our time in Rye, we caught the ferry and started to travel the Great Ocean Road! We stayed in Apollo Bay for a couple of days - I already wrote about our visit to Tarndie farm


We celebrated my husbands birthday while we were there. The dinner we had at Chris' Beacon was probably one of the best I ever had! Mmmm, so yummy! 


The last couple of days down in Victoria we spent in Warrnambool. To get there we drove the most touristy part of the Great Ocean Road. When we visited the Twelve Apostles Captain Poprocks and I were shoved out of the way by rude Chinese ladies who wanted the spot to take photos. This happened several times with the same group! Sometimes I don't get people... 


Other spots along the road were less crowded and thus we enjoyed looking at the sights more. Mother Nature is the true artist on this world, don't you think??

We spent our last week in Sydney doing all kind of fun things! The husband (and the Captain) quite enjoyed sailing in the Sydney Harbour for example! I loved the crochet/yarn/chatting times with Michelle best... We took plenty of pictures and I will write a short blog post about our time at Crochet Between Worlds HQ soon! :)


Oh man, the more I write about Australia, the more I want to go back... Cross your fingers it won't be another 5 years before Michelle and I get to see each other in person again!

Take care
Anne

Tuesday 18 April 2017

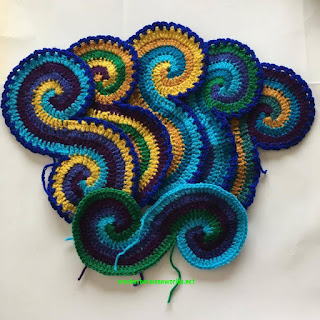
Ta-dah! The Peacock Double Spiral Afghan

Hey everyone! 

There's projects going on left right and centre here, including some super exciting stuff that we can't talk about yet ;) 

So for today, I'm going to share my finished Peacock Double Spiral Afghan with you!


My friend Lori wanted a snuggly blanket to go along with the ones I have made for her children, in peacock colours, and something a bit crazy and possibly paisley inspired. After some thought, I remembered buying this gorgeous Kaye Adolphson Double Spiral Throw pattern aaaages ago because it was so beautiful, but hadn't had the opportunity to make it yet - this was the moment! Lori also loved it, and after much discussion we came up with the colour selection in my very favourite (and colourful and hardwearing) Stylecraft Special DK. The colours are Mustard, Gold, Grass Green, Green, Teal, Empire, Royal, Turquoise, Emperor and Lobelia.


The next challenge was randomising the colours! As you know, making something look actually random takes a lot of preparation - I made up a table of colours, and when I needed extra spirals I outsourced to a wonderful engineer friend who is pretty amazing at spreadsheets! 

The double spirals were lots of fun to make (despite all the ends), and I got into an excellent rhythm working on those while watching tv, and my siblings playing the new Zelda Nintendo game. 


Rather than 5 x 5 spirals, I ended up making it 7 x 5 (so 35 double spirals) to make it a bit longer and more cuddly for an adult to snuggle under on the couch. It finished up about 1x1.5m. 

I decided to do the joining before the slipstitch detailing, in case blocking required more stretching and persuasion than the slipstitching would allow. And... oh man, the joining. I won't lie, the blanket very nearly got tossed off the balcony a few times! 

After doing a practice join 4 times, having it not sit even close to flat each time, and frogging whilst doing lots of swearing, I reached out to the designer for help. Kaye kindly sent me some higher quality, more detailed photos of the joins, which really helped. Thanks Kaye! I am hoping she will add those photos to the pattern as well so that future crocheters will have an easier time of it. The key was giving up any expectation I had of being able to do it evenly and regularly, and embracing the fudge. I do not like fudgy crochet.


After a preliminary block (just with water, which did very little), I worked the slipstitch detailing on the double spirals and the mini-spirals that fill the space between the double spirals. Using one colour cut down on the ends, but it still took a long time, and many many many more ends. I need a new yarn needle as all the silver has come off!! 


Final blocking time! I read up online about steam blocking acrylic, as this blanket was going to need some pretty intense help to get it to sit even vaguely flattish. I borrowed my Mum's steam iron, washed the blanket, slithered around on the floor on my stomach getting it all viciously pinned out, and started steaming... and brown lumpy goop splattered out along with the steam. Plus, it seemed to all be rising rather than going into the blanket. It was time for some creative thinking! 

My husband sprayed the blanket generously with cool water, and we let it soak in for a while. Then I put on a podcast, stuck my headphones in, and let rip with the hairdryer on high, moving slowly across each section until they felt warm and less damp under my fingers. We then left it all pinned out and went away for the Easter long weekend... 


And, it worked! The edge is still frilly (but was impossible to block, so I'm calling that a feature), and it's not 100% flat but looks much less like a coral reef! 


The slipstitching looks so good contrasted with the royal blue joining colour, and really brings it all together.

So, in summary: I'm glad I made this once, but I am in no hurry to make another one!

Tuesday 4 April 2017

2017 Sydney Royal Arts & Crafts Competition - Results!

Hey everyone!

This is just a quick post tonight, but I couldn't wait to let you know how I went at the 2017 Sydney Royal Arts & Crafts Competition!! 

All 6 of my entries were on display! 

I won a Highly Commended Ribbon for my Dragon Scale Booties!


And... a First Place AND Standard of Excellence for my Lotus Moon Tiles Afghan! :D :D :D 


This is such a huge achievement and honour!! If you're going to the Show over the next couple of weeks, take another picture for me? It hasn't quite sunk in yet...

Saturday 1 April 2017

Muster: The Last Butterfly Schal (German)

Hallo ihr Lieben,

anbei findet ihr die Übersetzung des "The Last Butterfly"-Schal von Michelle.


Das Muster nutzt zwei Maschenarten, deren deutsche Übersetzung ich nicht finden konnte. Wenn ihr den deutschen Begriff kennt, freue ich mich, wenn ihr uns eine kurze Nachricht schreibt. Es handelt sich um die Maschen "Foundation Sc" und "stacked standing dc". Ich habe beiden Maschen deutsche Namen verpasst und unten im Glossar verzeichnet. 


Für beide Maschen findet ihr Anleitungen. Für die Anfangsreihen-feste-Masche gibt es die Anleitung bisher nur auf Englisch. Wenn ihr großen, großen Bedarf anmeldet, werde ich die Anleitung in der Zukunft auch in Deutsche übersetzen.


Wenn ihr damit Probleme habt, meldet euch gerne - wir können euch sicher helfen. Am einfachsten ist es, wenn ihr uns auf Facebook schreibt.


Die Übersetzung ist leider nicht testgehäkelt. Ich habe mir größte Mühe gegeben, aber natürlich kann sich immer mal ein kleiner Fehler einschleichen. Solltet ihr einen entdecken oder glauben, einen entdeckt zu haben, schreibt mir doch bitte ganz fix! Danke!

Herzliche Grüße
Anne

-----------------------------------------------------
Der letzte Schmetterling - Schal
-----------------------------------------------------

Maße
165cm x 20cm

Materialien
-      Wolltraum Glitter Party 150g (Farbe: "The Last Unicorn")
-      3,5 mm Häkelnadel
-      Nähnadel
-      Schere

Abkürzungen
AfM: Anfangsreihen-Feste-Masche („Foundation Row“ – eine Bilderanleitung findest du hier)
Lm: Luftmasche
fM: Feste Masche
Stb: Stäbchen
DStb: Doppelstäbchen
gStb: Gestabeltes Stb (fM in die Zielmasche, führe die Nadel unten den äußersten zwei linken Fäden der fM hindurch, Faden aufnehmen und eine zweite fM häkeln. S. Fotoanleitung)


Anleitung

Anfangsreihe: 359AfM, 1Lm, wenden.  Um den Schal kürzer oder länger zu machen, brauchst du nur 14 AfM abziehen oder hinzufügen.

Reihe 1: gStb in die erste Masche, *Stb in die nächsten 7 Masche, 7Lm, überspringe 7 Maschen* wiederhole zwischen den ** bis zum Ende der Reihe, Stb in die letzte 8 Maschen, 1Lm, wenden.

Reihe 2: Wiederhole Reihe 1.

Reihe 3: gStb in die erste Masche, Stb in die nächsten 6 (Stb-)Maschen, *2Stb in die nächste Masche, 2Lm, DStb in die 4. übersprungene Masche der Anfangsreihe und umschließe damit die Lm-Kette aus Reihe 2, 2Lm, 2Stb in die nächste (Stb-)Masche, Stb in die nächsten 5 (Stb-)Maschen*,  wiederhole zwischen den ** bis zum Ende der Reihe, Stb in die letzten 2 Maschen, 1Lm, wenden.

Reihe 4: fM in die erste Masche, fM in die nächsten 8 Maschen, *2fM in den 2Lm Zwischenraum, fM in das DStb, 2fM in den 2Lm Zwischenraum, fM in die nächsten 9 Maschen, wiederhole zwischen den ** bis zum Ende der Reihe, 1Lm, wenden.

Reihe 5: gStb in die erste Masche, Stb in die nächsten 14 Masche, *7Lm, überspringe 7 Masche, Stb in die nächsten 7 Maschen, wiederhole zwischen den ** bis zum Ende der Reihe, Stb in die letzten 8 (Stb)-Maschen, 1Lm, wenden.

Reihe 6: Wiederhole Reihe 5.

Reihe 7: gStb in die erste Masche, Stb in die nächsten 13 Maschen, *2Stb in die nächste (Stb-)Masche, 2Lm, DStb in die 4. übersprungene Masche der 4.Reihe und umschließe damit die Lm-Ketten, 2Lm, 2Stb in die nächste Masche, Stb in die nächsten 5 (Stb-)Maschen*, wiederhole zwischen den ** bis zum Ende der Reihe, Stb in die letzten 9 (Stb-)Masche, 1Lm, wenden.

Reihe 8: fM in die erste Masche, fM in die nächsten 15 Masche, *2fm in den 2Lm Zwischenraum, fm in das DStb, 2fm in den 2Lm Zwischenraum, fm in die nächsten 9 Maschen, wiederhole zwischen den ** bis zum Ende der Reihe, fM in die letzten 7 Maschen, 1Lm, wenden.

Wiederhole die Reihen 1-8 zweimal, dann schließe einmal die Reihen 1-4 an. Masche am Ende von Reihe 4 ab.


Vernähe die Enden und blocke den Schal. Benutze dazu unbedingt genügend Stecknadeln, so dass man die Schmetterlinge hinterher gut sehen kann und sie ihre glitzernden Flügel ausbreiten können!