Showing posts with label bargello. Show all posts

Sunday, 22 May 2022

Stylecraft Blogstars Garden Party!

Hi everyone!

It's been an age - racing around after tiny people certainly doesn't allow much time for blogging, or crafting, or... well, pretty much anything else. Allie is 4 years old today, and the time has absolutely flown! 


We were so excited when Stylecraft and the Blogstars suggested a Garden Party for the Queen's Platinum Jubilee this year - we hope you visited JosieKitten's blog for her gorgeous Macaron circular cushion pattern on Friday! 

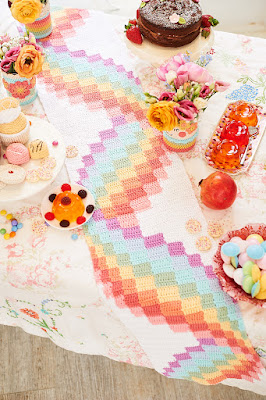
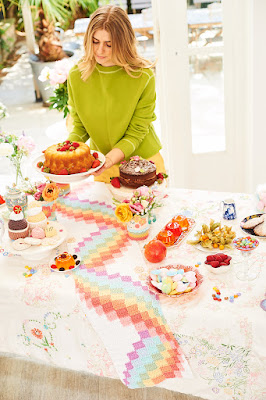
The Garden Party concept was just the creative spark we needed to put together a new design in our Bargello series. This is our Bargello Ribbon Table Runner (all photos in this post credit to Stylecraft Yarns and their amazing photography and design team). 

I've had this design mumbling around in the back of my head for ages, but just haven't had time to activate my almonds and get it out of the brain and into some yarn. It's based on a quilted bargello table runner that my mum has in a glorious patchwork pattern book, but in a pastel rainbow. I love the illusion of the ribbon twisting around itself up your table!

As with our existing bargello patterns, I'm not going to lie - the style of writing the pattern is a bit strange. Please know that I tried as many different ways of writing the pattern as I could think of, and this was the clearest! I encourage you to read it all (even the boring introduction bit), and watch the videos linked in the pattern, and always reach out (on social media, or by email to wrappedwithlovebymichelle@gmail.com is more reliable than commenting here) if you need a hand to get going. The pattern has been tested by three crocheters of varying skill levels, and the text independently reviewed. 


A plus for purchasers between now and December 31, 2022 - US$2.50 (over half the purchase price after fees) will be donated to The Rotary Foundation's End Polio Now campaign. Rotary has been working to defeat polio for over 35 years now, and worldwide cases have reduced by 99.9% in that time. There are only two countries now where polio is endemic, and ever decreasing numbers of wild polio cases in the world. As a proud Rotarian, I'm honoured to be able to support this very worthy cause. We are THIS CLOSE to ending the scourge of polio worldwide.


And now, the pattern! To view or purchase the pattern on Ravelry, go here:


https://www.ravelry.com/patterns/library/bargello-ribbon-table-runner


Keep bloghopping on 24 May to Janie Crow, who has created some really special decorations for our Garden Party!  

Monday, 9 November 2020

PATTERN: Queen Bargello Wave Bedspread AND Bargello Blocks Throw!

Hi everyone! 

Obligatory acknowledgement here that I've been terrible at blogging consistently again, along with vague intention to do better in the future... 

This year has just been bananas for everyone! Hot tip: International Student Exchange and Regional Human Resources Consulting are NOT relaxing industries to work in during a global pandemic, 0/10 do not recommend. The jobs themselves are fascinating and interesting, but after the constant tsunamis of feelings coming at me for months on end, the idea of doing anything constructive other than staring at the wall has been too much to contemplate.

However, I have made progress on my goal of getting written/designed patterns actually up there and published this year, and today is one of those red letter days!

In August, I finally published (to no announcement and fanfare) my Impossible Hexagon Sweater and Cardigan patterns, which I'll blog about another day (but here are the links to the patterns if you want to have a look:

Impossible Hexagon Sweater

Impossible Hexagon Cardigan)

But, to today's news!

After the success of our Bargello Wave Baby Blanket, we decided to try and figure out how to make a bigger version that didn't lean even harder to the right, and by goodness we cracked it! Today I can share with you not one, but TWO larger bargello blanket patterns! Both of these test beauties were made by my partner in crochet crime Anne, and I'm sure you'll agree she's done an outstanding job.


BARGELLO BLOCKS THROW

Pattern Link: https://www.ravelry.com/patterns/library/bargello-blocks-throw 


This design is worked corner to corner using a unique block method, along with the classic bargello style of maintaining the same block height whilst changing the width of each column of blocks. This is what creates the wave effect! Anne took her test blanket to the beach and my jaw literally dropped when the photos came in.


QUEEN BARGELLO WAVE BEDSPREAD

Pattern Link: https://www.ravelry.com/patterns/library/queen-bargello-wave-bedspread


The bedspread is a massive 210cm square (unblocked) to fit your queen size bed, and is made with larger blocks and two strands of yarn held together. 


If you love both of these patterns, for the next two weeks 
(until Saturday 21 November), 
put both patterns in your Ravelry cart and use the code

UNDULATE

to get a discount! 

Friday, 5 January 2018

GUEST POST: Carole Marie's Vinicunca Blanket

Happy new year everyone!! 

We have a treat for you today - a guest post from Carole of Carole Marie Designs! We absolutely adore Carole's colourful, geometric designs, and recently she was inspired by Michelle's Bargello Baby Blanket to create a crazy zig zag of bargello called the Vinicunca Blanket. We asked her to write a little bit about her design process, and it is absolutely fascinating to get a peek into a designer's brain!

And, just for our wonderful readers, Carole is offering  her Vinicunca Blanket pattern to us for free until next Tuesday, 9 January 2018!! 

Head to https://www.ravelry.com/patterns/library/vinicunca and use the code vinim 

Thank you Carole!

-----------------------------------------------------------------------------------------


Where did Vinicunca come from?  Well thats easy really, it came from the Michelle’s Bargello pattern and a frustrating moment of not being able to control my tension.  Michelle and I share an interest in the formation of Bargello, Michelle in stitching, myself in the quilting form. The other thing I love is colour, bright rainbow colour so it seemed the right moment to have a bit of a play.  However my play wasn't working, tension issues.  I don't know why but I couldn't close the gap, it just wasn’t happening.  So I sat for a while getting more and more frustrated ready for throwing my hook into the naughty corner, when I realised that maybe I could turn single stitches into clusters instead and see if that worked.  Well easier said than done.  MATHS!  Another favourite of mine, I like to play with numbers.  

So then here’s Michelle pattern, to make the clusters sit right I would need to make the beginning chain 3 lengths longer... heck hold on ... its going to big.   Well OK sorted out the starting chain, applied Michelle’s technique and got cracking.   WHOOPS hold on.... now I had a long BUT skinny piece of work, well that was no use for a blanket.  Ermmm... got to work this out now, again a couple of hours of frustration playing around with stitches and how to make my blanket fatter (I only do fat blankets).  

Then hey presto a mad moment of thinking: What if I could reverse and mirror image the pattern. making sure the same colours sat on top of each other?  Again I had to play around with the stitches how could I work this backwards so everything sat at the right ?  I think on the 4th attempt I had worked it out so off I went again.  Once that second part was finished it was looking fatter but still a rectangle PLUS I still had half of my 12 colours left, I don't like to waste yarn, if I can I'll use a full ball of yarn.  So off I went again mirroring the pattern until 4 sections had been finished.  Still some yarn left so applied a simple border with all 12 colours and finished off with the dreaded crab stitch.

It was a real tah da moment for myself, a pleasing journey of creativity.  Of course I had to show it off and asked Michelle if I could write the pattern up and publish it.  And wonderfully she said yes. Then inspired by some of my closest crochet friends, the blanket was named Vinicunca, representing the mountains in Peru.  


This also meant that after a long period of time I had my 50th pattern to publish.  It had been such a long time, because of opening my own yarn shop that I had published anything.


This is what happens when you Crochet Between Worlds, you make great creative friends willing to share techniques and design ideas.

Wednesday, 6 September 2017

PATTERN: Bargello Wave Baby Blanket!

Hey everyone! 

My brand shiny new Bargello Wave Baby Blanket pattern has been published!!


You can find it, buy it, queue it and favourite it here on Ravelry:

http://www.ravelry.com/patterns/library/bargello-wave-baby-blanket

There is a discount coupon running until Monday night, you can find it by checking out Crochet Between Worlds on Facebook (https://www.facebook.com/crochetbetweenworlds/) or Instagram (https://www.instagram.com/crochetbetweenworlds/) ;) 

But for now I'm just going to post heaps of photos, because I am so in love with this design and the pretty colours <3 <3 <3


Tuesday, 29 August 2017

Adventures in Patchwork - Rainbow Bargello!

Hey everyone! 

We are having such a confused winter here - one day it's gloriously sunny, 25 degrees and shorts weather, the next it is literally raining ice and so cold I feel I will never be warm again :/ 

Fortunately I've had lots of inside projects to work on! I finished my second pair of socks (which deserve a post all of their own), wrote up two new designs, helped organise a fundraising High Tea for Days for Girls, and all the administration for our next batch of inbound and outbound exchange students. Phew! I also wanted to spend some time with my mum so we decided to make a king size rainbow bargello wave patchwork quilt for my new king size bed. 


Aren't these colours just glorious?! Most of them are the same print, a (now discontinued) fabric called Flutter, plus a few ring-ins to smooth out the rainbow gradient.

I think the thing I love most about making bargello patchwork is that it is as much about organisation as it is sewing. Sewing is not my greatest skill; I can do it, but not nearly as accurately or well as my mother can. But I can contribute to a bargello by doing the maths, organising the pieces, keeping track of where we're up to, and enabling mum to just concentrate on sewing! 


The first step in a bargello is making the strip sets. This involved cutting strips of each colour, then sewing them together in the right order to make panels of striped fabric. Then, we cut the strip sets into strips the other way, at different widths. 


The easiest way to keep track of each size (as they are only 1/4" different!) is to have a ziploc bag for each size! Then I can take out what I need for the next thing without having to keep track in my head of what's going on.


Once the strips are all cut and the ends sewn together to make a loop, the bargello fun begins! Each strip gets unpicked at the right spot, its row number pinned on, the correct edge pinned together, and then back to the sewing machine!


I made two mistakes with this quilt, fortunately both fixable but still irritating. 

My first error was, I very carefully calculated the width of the quilt and worked out how many strips of each size we would need; except, I forgot to account for seam allowances. So it was too narrow by 1/2" per column. SIGH. We ended up adding rows -3, -2, -1, 64, 65, 66 and 67 to make up the extra width.

My second error was caused by getting too excited about being finished, and I unpicked a few strips in the wrong place. This caused metres of unpicking but it was all worked out! Unpicking in sewing is even sadder than frogging crochet :'( 


The quilt grew bit by bit, wave by wave...


... until it was finished!! 


Now it's off to Goulburn to visit Yvonne and get quilted, with that glorious teal fabric on the back, and I cannot wait to get it onto my bed!! 


Tuesday, 24 March 2015

Success at the Sydney Royal Easter Show!

Hello everyone! 

Just a short blog post tonight, but I'm exploding with excitement that I just have to share with you all!!

Tonight was the Preview Exhibition for the Sydney Royal Easter Show Arts and Crafts Competition. You might remember that I entered a Road Trip Scarf, a candy happypotamus (General Millie, Captain Poprocks' future wife) and my Rainbow Twist and Turn Bargello Afghan into the competition. It was my first time entering, so I wasn't expecting anything - just getting my entries on display would have been amazing.


BUT! I did so much better than that! Not only did all three of my items end up on display...


... I won SECOND PLACE in the Crochet Art section for the Rainbow Twist and Turn Bargello Afghan...


... and FIRST PLACE (BLUE RIBBON!!) FOR GENERAL MILLIE IN THE CROCHETED/KNITTED SOFT TOYS SECTION!!!!


Plus, by the time we got to the exhibition, an hour after it opened, the scarf and happypotamus had already been purchased :D :D :D 

I'm still fizzing about the place several hours later, just so excited and thrilled and beaming like an idiot (see above pictures for proof)!! 

THANK YOU all for your support and appreciation for the crochet work that Anne and I create! It gave me the confidence to enter the Show, and I am just so happy with the results! 

Tuesday, 13 January 2015

Little Tuesday Update!

Hello everyone! Welcome to all of our new readers, and hugs for old friends :) 

Wow! The response to my Rainbow Twist and Turn Bargello Afghan has been phenomenal - 1300 views of the pattern, 280 favourites on Ravelry and two projects started already :D  


Mine is all safely washed and dried and photographed and rolled up in plastic, ready for its next outing at the Sydney Royal Easter Show. I entered the Show for the first time this year, in 3 categories:

1. Adult Accessories - I'm going to submit a Road Trip Scarf to this category;

2. Soft Toys - A candy hippo, my favourite; and

3. Creative Crochet (Exhibitor's Own Design) - the Bargello Afghan.

Unfortunately I couldn't enter the afghan into the afghan category as that requires the blankets to be made from wool or wool blend, not 100% acrylic :( Oh well, now I know for next time!

There'll be a brand new afghan design coming soon - here is a sneak peek for you!


I've been stuck at home with terrible fatigue, bored off my nut for the last few days. I have been slowly getting through some scarves, and trying to clear my WIP pile so I can start new projects with a clear conscience.  Here are three more scarves, in some different yarn to my usual Moda Vera Fayette!

James C Brett - Woodlander (5)


King Cole Riot (414)


Yarn Bee Aurora Borealis (Fruit Punch)


As I am writing this, I have received some very bad news. Anne's grandfather passed away today at the grand age of 101. As you all know, Anne was very close to her grandfather, and he used the blanket that she made for him every day. 

Please send her lots of love and hugs and support in this difficult time. 

Thursday, 8 January 2015

PATTERN: Twist and Turn Bargello Afghan

Ta dah! My Rainbow Twist and Turn Bargello Afghan is finished! 


I loved making it so much - the small squares and join-as-you-go technique meant that I felt like I was working very fast! Plus, only two ends to weave in for each square, and no growing pile of little squares to join at the end. Overall it took me 16 days of holidays when I was doing very little else (other than watching Downton Abbey). This project would be very easy to do a little and then pack away with the chart and pick up again later.

I am full of dreams about my next bargello-style afghan now... watch this space!

You can bookmark or favourite this pattern on Ravelry for later here:

http://www.ravelry.com/patterns/library/rainbow-twist-and-turn-bargello-afghan


-----------------------------------------------------------------------
PATTERN: RAINBOW TWIST AND TURN BARGELLO AFGHAN 
-----------------------------------------------------------------------

Finished Size: 125cm x 125 cm / 49" x 49"


This pattern uses simple 2 row granny squares, joined with slip stitches during the second row in place of chains. It is very simple to make - the beauty is in the arrangement of colours to imitate the well-known patchwork bargello pattern, Twist and Turn. 

GENERAL INFORMATION

Materials:

2 x 100g balls of Stylecraft Special DK in each of:

Matador (red)
Jaffa (orange)
Saffron (light orange)
Citron (yellow)
Spring Green (pale green)
Green (dark green)
Petrol (dark blue)
Cloud Blue (light blue)
Lavender (blue-purple)
Violet (red-purple)

(total: 20 balls)

3.5mm/E hook

Yarn needle

Scissors

Terminology:

This pattern uses US terminology. 

sl st = slip stitch
ch = chain stitch
sc = single crochet
dc = double crochet

Special stitches:

Stacked Standing Double Crochet - sc into target stitch. Insert hook under two leftmost strands of sc, yarn over hook to do a second sc.


I prefer this stitch to other forms of standing dc, and it looks much better than chains. Replace with 3ch if you prefer not to use this stitch.

No Slip Magic Circle - I prefer this double loop to a single loop magic circle as I found I was weaving ends in with an extra circle before doubling back with the single loop - this cuts out one extra weaving step! Nerdifacts has an excellent picture tutorial on the No Slip Magic Circle :)

CHART

Work from the top left corner in rows from left to right. I recommend stopping to weave in the ends every 10 squares or so. 

INSTRUCTIONS - 2 ROW GRANNY SQUARES - JOIN AS YOU GO:

First square:

1. Start with a No-Slip Magic Circle. 


2. Do a stacked standing double crochet into the magic circle, then (2dc, 2ch), (3dc, 2ch)x3 all into the magic circle, and join into standing dc with a slip stitch. Tighten up the circle so there is no visible hole in the centre.


3. In the 2ch space you just made, do another stacked standing double crochet followed by 1ch, then (3dc, 2ch, 3dc, 1ch) into each of next three 2ch spaces. In the final 2ch space, do (3dc, 2ch, 2dc) and then join with a slip stitch to the standing dc. Finish off.  


Joining squares on one side only:


1. Complete steps 1 and 2 as for the first square. 


2. Do another stacked standing double crochet followed by 1ch, then (3dc, 2ch, 3dc, 1ch) into the next two corner 2ch spaces. In the next 2ch space, do 3dc, 1ch. In place of the second corner chain, slip stitch into a 2ch space of the square you want to join to (the red square in the picture). 


Continue with 3 dc. In place of the next chain, slip stitch into the corresponding 1ch space of the red square. 


Do another 3dc. Slip stitch into the corner 2ch space of the red square. 


Ch1, then 2dc and slip stitch into the top of the standing dc. Finish off.

Joining squares on two sides.


1. Complete steps 1 and 2 as for the first square. 

2. Do another stacked standing double crochet followed by 1ch, then (3dc, 2ch, 3dc, 1ch) into the next corner 2ch space. In the next 2ch space, do 3dc, 1ch. In place of the second corner chain, slip stitch into the adjacent 2ch corner space of the first square you want to join to (orange square A in the picture). 


Continue with 3 dc. In place of the next chain, slip stitch into the 1ch space of the orange square. 


Do another 3dc. Slip stitch into the corner 2ch space of the orange square A, and then slip stitch into the corner 2ch space of the green square B. Ignore the red square B altogether! 


Continue with 3 dc. In place of the next chain, slip stitch into the 1ch space of the green square. 


Do another 3dc. Slip stitch into the corner 2ch space of the green square. Ch1, then 2dc and slip stitch into the top of the standing dc. Finish off.


INSTRUCTIONS - BORDER

The border is a simple tweed stitch (1sc, 1ch). I did a row of each of the rainbow colours, starting with Matador and ending with Violet (10 rows).

Row 1: The first row is all worked into the tops of the stitches and chains of the squares below. Start by joining the yarn with an sc on any corner into the second corner chain.


*Ch1, skip one stitch and sc into the next stitch*. Repeat until you get to the next corner. You should end up with 5sc in one square and 4sc in the next, repeating along the row. 


After you sc into the second corner chain, 2ch and sc into the same stitch. Then continue along as before. Repeat until you get back to the stitch where you first joined the yarn. 2ch, sl st into top of the first sc. Finish off and weave in ends.


Subsequent rows:

Join yarn with an sc into any ch1 space. *ch1, skip sc and sc into the next ch1 space*. Repeat until you get to a corner. In the corner ch2 space, do 1sc, 2ch, 1sc. Continue to repeat * * until you get back to your starting stitch. Ch1, sl st into the first sc. Finish off and weave in ends.


We'd love to see your finished blankets, and answer questions you have on our Facebook page!