Showing posts with label design. Show all posts

Sunday, 22 May 2022

Stylecraft Blogstars Garden Party!

Hi everyone!

It's been an age - racing around after tiny people certainly doesn't allow much time for blogging, or crafting, or... well, pretty much anything else. Allie is 4 years old today, and the time has absolutely flown! 


We were so excited when Stylecraft and the Blogstars suggested a Garden Party for the Queen's Platinum Jubilee this year - we hope you visited JosieKitten's blog for her gorgeous Macaron circular cushion pattern on Friday! 

The Garden Party concept was just the creative spark we needed to put together a new design in our Bargello series. This is our Bargello Ribbon Table Runner (all photos in this post credit to Stylecraft Yarns and their amazing photography and design team). 

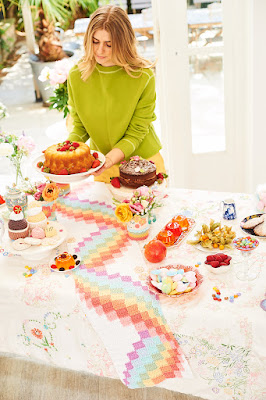
I've had this design mumbling around in the back of my head for ages, but just haven't had time to activate my almonds and get it out of the brain and into some yarn. It's based on a quilted bargello table runner that my mum has in a glorious patchwork pattern book, but in a pastel rainbow. I love the illusion of the ribbon twisting around itself up your table!

As with our existing bargello patterns, I'm not going to lie - the style of writing the pattern is a bit strange. Please know that I tried as many different ways of writing the pattern as I could think of, and this was the clearest! I encourage you to read it all (even the boring introduction bit), and watch the videos linked in the pattern, and always reach out (on social media, or by email to wrappedwithlovebymichelle@gmail.com is more reliable than commenting here) if you need a hand to get going. The pattern has been tested by three crocheters of varying skill levels, and the text independently reviewed. 


A plus for purchasers between now and December 31, 2022 - US$2.50 (over half the purchase price after fees) will be donated to The Rotary Foundation's End Polio Now campaign. Rotary has been working to defeat polio for over 35 years now, and worldwide cases have reduced by 99.9% in that time. There are only two countries now where polio is endemic, and ever decreasing numbers of wild polio cases in the world. As a proud Rotarian, I'm honoured to be able to support this very worthy cause. We are THIS CLOSE to ending the scourge of polio worldwide.


And now, the pattern! To view or purchase the pattern on Ravelry, go here:


https://www.ravelry.com/patterns/library/bargello-ribbon-table-runner


Keep bloghopping on 24 May to Janie Crow, who has created some really special decorations for our Garden Party!  

Monday, 9 November 2020

PATTERN: Queen Bargello Wave Bedspread AND Bargello Blocks Throw!

Hi everyone! 

Obligatory acknowledgement here that I've been terrible at blogging consistently again, along with vague intention to do better in the future... 

This year has just been bananas for everyone! Hot tip: International Student Exchange and Regional Human Resources Consulting are NOT relaxing industries to work in during a global pandemic, 0/10 do not recommend. The jobs themselves are fascinating and interesting, but after the constant tsunamis of feelings coming at me for months on end, the idea of doing anything constructive other than staring at the wall has been too much to contemplate.

However, I have made progress on my goal of getting written/designed patterns actually up there and published this year, and today is one of those red letter days!

In August, I finally published (to no announcement and fanfare) my Impossible Hexagon Sweater and Cardigan patterns, which I'll blog about another day (but here are the links to the patterns if you want to have a look:

Impossible Hexagon Sweater

Impossible Hexagon Cardigan)

But, to today's news!

After the success of our Bargello Wave Baby Blanket, we decided to try and figure out how to make a bigger version that didn't lean even harder to the right, and by goodness we cracked it! Today I can share with you not one, but TWO larger bargello blanket patterns! Both of these test beauties were made by my partner in crochet crime Anne, and I'm sure you'll agree she's done an outstanding job.


BARGELLO BLOCKS THROW

Pattern Link: https://www.ravelry.com/patterns/library/bargello-blocks-throw 


This design is worked corner to corner using a unique block method, along with the classic bargello style of maintaining the same block height whilst changing the width of each column of blocks. This is what creates the wave effect! Anne took her test blanket to the beach and my jaw literally dropped when the photos came in.


QUEEN BARGELLO WAVE BEDSPREAD

Pattern Link: https://www.ravelry.com/patterns/library/queen-bargello-wave-bedspread


The bedspread is a massive 210cm square (unblocked) to fit your queen size bed, and is made with larger blocks and two strands of yarn held together. 


If you love both of these patterns, for the next two weeks 
(until Saturday 21 November), 
put both patterns in your Ravelry cart and use the code

UNDULATE

to get a discount! 

Wednesday, 6 September 2017

PATTERN: Bargello Wave Baby Blanket!

Hey everyone! 

My brand shiny new Bargello Wave Baby Blanket pattern has been published!!


You can find it, buy it, queue it and favourite it here on Ravelry:

http://www.ravelry.com/patterns/library/bargello-wave-baby-blanket

There is a discount coupon running until Monday night, you can find it by checking out Crochet Between Worlds on Facebook (https://www.facebook.com/crochetbetweenworlds/) or Instagram (https://www.instagram.com/crochetbetweenworlds/) ;) 

But for now I'm just going to post heaps of photos, because I am so in love with this design and the pretty colours <3 <3 <3


Tuesday, 4 July 2017

Adventures in Designing

Hi everyone! 

Gosh, life gets busy for a few weeks then you turn around and it's July!? I am so not ready for it to be less than 6 months to Christmas!

It's been announced on Facebook and Instagram, but I don't think it's happened on here yet: Crochet Between Worlds have joined the Stylecraft Blogstars!! It's so exciting to be working with our favourite yarn brand, and to be on the same team as our crochet idols like Lucy from Attic24, Jane Crowfoot, Kathryn from Crafternoon Treats, Zelna Olivier... pretty mindblowing for us two little amateur crocheters. 


You can read our blurb on the Stylecraft website here: https://stylecraft-yarns.co.uk/blog/Anne-and-Michelle/

Ever since we got the gig, my brain has been buzzing even more with design ideas. One of the perks is that Stylecraft is happy to send us yarn for designing with, and I had not realised how much yarn budgeting was hampering my creative brain. 

But, being up at 3am because I had an idea for a design that wouldn't let me sleep anymore was not really assisting my health or my energy during the day to actually do things. It got so crazy that I had to do something to get ideas out of my head but not forgotten. I have a folder on my computer, but that's less convenient for jotting down thoughts or a quick sketch of an idea.

Meet my design journal! Like many people I am a total sucker for pretty stationery, and this Leuchtturm A5 diary is SO pretty. It has a hard cover so I can whip it out and scribble anytime, anywhere, and an elastic to hold it shut when I go overboard sticking photos and printed layouts in it :P


I'm eventually going to decorate the rest of the cover with pretty crochet pictures, but my photo printer is at the doctor's at the moment. 

Inside is also really cool - the pages are numbered, and there's an index at the front! I'm enjoying just opening a random page to jot down an idea, then adding a title to the index! I am finding the blank space more thrilling than daunting - so much more room to put more ideas!


The pages are perfect for designing - rather than being lined or blank, each page has a grid of dots. This keeps my handwriting (mostly) straight but also makes it easy to sketch shapes of ideas evenly. 


I'm just putting the final touches on this origami bag design, then it'll be published for free here!! 

Do you have a recording system for designing? How do you keep track of ideas?

Next time: Adventures in Sock Knitting!

Hugs,
Michelle

Tuesday, 25 October 2016

FREE PATTERN: The Fiesta Clutch!

I had time last weekend to play with an idea that had been bumping around in my head for a while - a freeform slipstitch fabric, folded in three to make a little clutch purse. If you read this blog regularly you'll know that I am a stickler for precision, organisation, structure, patterns... all of which I had to pretty much ignore in order to get this idea out of my head. 


It went bananas on Instagram and Facebook as I posted project pictures over the weekend. So, by request, here is the "pattern" to make your very own Fiesta Clutch :) 

Please keep in mind that this is an inherently random and personalised pattern - no two (even made by the same person) will be exactly alike. So, consider the following a set of guidelines and supports to help you rather than a strict pattern!

Queue or Favourite this pattern on Ravelry here: 
http://www.ravelry.com/patterns/library/fiesta-clutch

-------------------------------
PATTERN: FIESTA CLUTCH
-------------------------------


Materials:
- base colour 4 ply cotton - ~50g (I used Red Heart Miami in White)
- mixed coloured 4 ply cottons - ~50-80g all up (I used Red Hear Miami in blue, purple, pink, orange, yellow and green - use as many or as few as you like).
- Vilene or other iron on interfacing 
- 2.75mm hook and 3 or 3.25mm hook
- scissors
- yarn needle
- iron (with a steam setting) and ironing board
- press studs
- sewing needle and thread

Stitches:
This pattern uses all US terminology

ch - chain stitch
sc - single crochet
slst - slip stitch

Notes:

- Use 100% cotton or bamboo yarn! The surface slip stitching will stretch and warp your fabric base, and you need to be able to apply heat and steam with an iron to get it flat again, as well as ironing on the interfacing. If you use acrylic, the fabric will go really strange and droopy when you iron it.


PATTERN

Part 1 - Base Fabric

Use 2.75mm hook

The first thing to do is decide how big you want your Fiesta to be - coin purse? clutch? laptop cover? The height of the base fabric should be 3 times the height of your finished bag, but you can play around with how long each fold is.

For example, my white Fiesta Clutch fabric pictured above is 19cm wide and 33cm high, which was 40sc and 72 rows for me. Your tension may be different. 

Once you have your measurements, make a chain a bit longer than you want the width of the bag. The length will depend on your tension; if you want to be 100% sure of a snug fit, a tension swatch is helpful. 

ch1 extra at the end, and turn. sc into the second chain from your hook, and sc in each ch to the end. 

*ch1, turn, sc in each sc to end of row* 

Repeat * to * until your base fabric is the height you want. Next, we will do an sc border around with an extra sc in each corner to give a clean edge for joining later. 

sc border:
ch1, turn, 2sc first sc, then sc in each stitch to end of row, 2sc in last stitch. Turn your fabric 90 degrees, sc in the end of the last row (this is probably the same space that you did the 2sc in). Continue sc in the side of each row until you reach the next corner. Turn your fabric 90 degrees, 2sc in the first ch of starting chain (same space as the last sc of the side edge). sc in each ch to the end of the row, 2sc in the last ch. Turn your fabric 90 degrees, and sc in the first row of sc. sc in each row to the end, slst join to first sc. Finish off. 


(for the first Fiesta I made, I did the sc border after the freeform slip stitching and it was much more difficult at that stage!)

Part 2 - Free Form Slip Stitch

Use 3 or 3.25mm hook.

This is the part where you get to make your own artwork! 

Start a thread by pulling a loop through from back to front with your hook. Don't tie a knot, just keep a long starting tail and we'll sort those out later. 

To finish a thread, cut a long-ish tail and pull through your last loop, then pull the little knot and tail to the back of your fabric. 


Some guidelines for your crochet drawing:

1. Don't cross the stitches over - it'll make the fabric lumpy and it won't sit nicely at the end.

2. Don't make your slipstitching too dense. Making spirals and circles and diagonals will tug your base fabric in all sorts of strange directions, and if the decoration is too dense then we won't be able to make it sit flat at the end. 


You can see in this first picture that I had wayyy too many stitches in the space, and it was stretching the base fabric completely out of shape. Your fabric will get a bit lumpy and bumpy, but you should be able to mostly flatten it out with your fingers. 

3. Don't be afraid of letting the base fabric show! It's part of the art!


4. Let your creative spirit fly! There is no right or wrong way to do this :D 


Part 3 - The Ends

Once you've created your one-of-a-kind masterpiece, it's time to deal with all those ends.


With a yarn needle, run each end under 4 or 5 stitches at the back, away from the edges, then snip off leaving a 1cm-ish tail.


The next task is to iron your fabric flat. With a fairly hot iron and the maximum steam setting, gently press the fabric. You might need to do a bit of tugging and stretching to get the piece back to rectangular and deal with the edges. Take your time ironing, and don't forget to iron both the front and back. 

To secure all those ends and make a workable bag, we are going to cheat!! Get yourself some Vilene (iron-on interfacing, usually used in dressmaking and applique to give structure and firmness), and cut out a rectangle that is the same size as your fabric INSIDE THE SC BORDER. It's really important that you can still access the sc border as you'll need it to join up your bag. 


Place your Vilene piece on the back of your fabric (sticky side down please) and iron on gently. It will take about 5 minutes of ironing for everything to glue together, so be patient. It's still faster than figuring out how to secure all those ends separately! Give it some time to cool down and set the glue - maybe 10-15 minutes - before you move onto assembly. 

Part 4 - Assembly


Now let's make your flat fabric into a bag! 

First step is to play around, folding your fabric until you're happy with the overlap on the front and the pocket inside. Turn it over so you're looking at the front and back, and the pocket is on the underside.


Pick up your larger hook (3 or 3.25mm) and pull a loop of your favourite colour through the sc border at the bottom right corner (marked with a green arrow on the picture above). slipstitch the two layers of fabric together. Once you run out of pocket, continue slipstitching around the sc border until you come back to the other side of the pocket. Then, slipstitch together the final section, finish off, and use your yarn needle to poke the ends in between the fabric and Vilene. You might want to give it another quick iron to make sure everything is solidly glued down! 

Sew your press studs on securely with a sewing needle and thread (I put mine in the corners of the front flap to give extra protection to the Vilene corners).

Ta-dah! Your very own one-of-a-kind, useful artwork :D 


Wednesday, 17 June 2015

Freiburg Adventures

Hi all!

We spent the last couple of days in Freiburg, down in the South of Germany. The boyfriend had an event at the uni down there and thus we decided to combine it with a bit of a holiday.

Freiburg is close to the French border, the Alsace is right around the corner. Thus the town has a rather French feel to it and the wine is fantastic. Our wine taste is a bit exotic for most people as we love Gewürztraminer and Muscat but down there we had a huge selection - even in the supermarket. Wow! So cool! As you might imagine, we had a lot of wine. Oops.


The old town is beautiful and so is the farmer's market at the Münster, the place in front of the cathedral. So many fresh veggie and fruit stalls, fresh bread and so on. Oh my, I could shop there every day. The farmer's market here in Dortmund is nice but nothing compared to the one I saw in Freiburg... 


Of course I took a huge bag of crochet with me. Wouldn't go anywhere without it, would you? I was working on two baby blankets and also on the new beanie pattern. The bonfire beanie pattern is 95 % finished but I decided to try out all the sizes again. And as it happens I decided to make small changes in the pattern as well. I hope to get it finished this week, so that Michelle can read it through. 


In the near future I intend to translate the pattern into German, actually I would like to do that with all of Michelle and my patterns. So far I haven't found the time though. Translating takes a lot of time, something I did not expect when I translated my first pattern (Alia's Sunday Shawl). German crochet is a lot more complicated as English if you ask me. For example, there seems to be no short wording for s2tog or hdc2tog. I wish there was! Well that and the fact that I learnt to crochet in English. So there might be a lot of words/terms I don't know yet. Funnily I find it easier to translate French patterns into English... My French teacher would have a good laugh if she heard this. Let's put it like this: I wasn't the best French student. Laughs. 

Perhaps the translation process will get faster with more experience. Do you have any experience with translating patterns?

Take care
Anne

Tuesday, 14 April 2015

Fussy Brain Crochet Time

Good Evening!

Thank you for your kind words regarding my granny's passing. The funeral was really nice and while we miss her a lot, we are happy that she is with my grand-dad now.

Some weeks ago, Michelle and I switched our blog days. The switch makes a lot of sense regarding our work times, however my brain is still confused by it... So, last week, I forgot to blog on Tuesday. Oops.


Looks like all my brain power went into pattern testing. Do you remember the flames which Michelle posted some weeks ago? Well, I put them into a beanie. What started as a seemingly easy idea ended up being rather complicated. There was a lot of frogging, cursing and almost crying involved. Due to the way the flames are crocheted, the beanie has to be started from the bottom. This makes sizing a lot harder as crochet beanies usually start from the top.

Several beanies later, it looks as if I nailed it... I think. Now it is time to write up the pattern and adjust it to different sizes. So many stitches, so many numbers, so much counting. My brain is pretty cooked up. 


I also started to work on Michelle's ZigZag Tote. So far I made the bottom part and am in a bit of a fight with numbers again. Sighs. I know how it should look, I know how it is crocheted but at the moment my brain/hands can't do it. Laughs. Hopefully tonight! I have a desperate urge to move on to the colourful part as I have been crocheting with black too much over the last couple of days. 


My yarn stash is a bit of a mess and rather large. Time to do something about that! So last week I ordered a yarnwinder which arrived yesterday. While I am a bit unhappy with the quality (it wasn't that cheap!), it is mostly working fine. True, it ate some yarn last night but now I kinda know how it works best. Aren't these yarn cakes adorable?!


How is life and crochet going for you these days? Fussing brain like me or crochet wonderwoman? :)


Take care
Anne

Friday, 10 April 2015

PATTERN: Zig Zag Tote Bag

Thanks everybody! The Crochet Between Worlds Instagram account has reached 400 followers! 

As a special thank you to all our readers, followers and likers, we have a special offer for you on Michelle's brand new pattern - the Zig Zag Tote Bag!


Head over to the pattern page on Ravelry, hit "Buy it Now" and enter the coupon code for a 50% discount:


CBW400

We'd love it if you could give the pattern a bit of love by adding it to your favourites (it's easiest to do this before you buy it!). 

Thank you all so much again, here's to many more posts, patterns, ideas, designs and friends!  

Tuesday, 3 March 2015

Sophie's Universe Part 8... plus a sneak peek!

Hello everyone! 

Thank you for all your lovely comments and ideas for hippo names on my last post - once we know that she's coming home from the Easter Show, the little candy Happypotamus will be christened General Millie, and we will see if she'll accept the Captain as her boyfriend/husband and become a Poprocks. Stay tuned! 

We love reading each and every one of your comments, on here and on Facebook and Instagram :) 

It was Part 8 of the Sophie's Universe CAL this week - only 7 rows, but they are getting pretty big!! We seem to be making a big flower along the "short" sides (which are now longer than the "long sides"!), and a crazy busy garden along the "long" sides. I got to learn two new stitches as well - puff stitch and cable stitch! I liked the puff stitch, less excited about the cable stitch.


Nicole has really sped up on her Sophie, now that she's comfortable reading the pattern. It's a pretty big ask when you've only been crocheting for two months! 


Mum and I joined Lunchtime Crochet Club at Crows Nest with Nicole and Kathryn last Friday :) We had a lovely time eating possibly the best fish and chips I've ever had, and working on our Sophies. 

Now for the sneak peek :P As you know I've been working on another pixel blanket pattern following the Rainbow Twist and Turn Bargello Afghan. Hopefully I will have it all finished by Easter so you can put the Rainbow Hearts Afghan into your Ravelry queue for a Mothers Day project!! 

The chart is done! 


The yarns are ready and waiting! My favourite Stylecraft Special DK of course!


I wanted to do something new for you though, so this afternoon I had a fiddle around with making a tiny heart granny square! What do you think?