Showing posts with label spiral. Show all posts

Tuesday, 18 April 2017

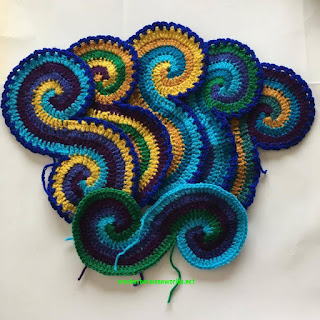
Ta-dah! The Peacock Double Spiral Afghan

Hey everyone! 

There's projects going on left right and centre here, including some super exciting stuff that we can't talk about yet ;) 

So for today, I'm going to share my finished Peacock Double Spiral Afghan with you!


My friend Lori wanted a snuggly blanket to go along with the ones I have made for her children, in peacock colours, and something a bit crazy and possibly paisley inspired. After some thought, I remembered buying this gorgeous Kaye Adolphson Double Spiral Throw pattern aaaages ago because it was so beautiful, but hadn't had the opportunity to make it yet - this was the moment! Lori also loved it, and after much discussion we came up with the colour selection in my very favourite (and colourful and hardwearing) Stylecraft Special DK. The colours are Mustard, Gold, Grass Green, Green, Teal, Empire, Royal, Turquoise, Emperor and Lobelia.


The next challenge was randomising the colours! As you know, making something look actually random takes a lot of preparation - I made up a table of colours, and when I needed extra spirals I outsourced to a wonderful engineer friend who is pretty amazing at spreadsheets! 

The double spirals were lots of fun to make (despite all the ends), and I got into an excellent rhythm working on those while watching tv, and my siblings playing the new Zelda Nintendo game. 


Rather than 5 x 5 spirals, I ended up making it 7 x 5 (so 35 double spirals) to make it a bit longer and more cuddly for an adult to snuggle under on the couch. It finished up about 1x1.5m. 

I decided to do the joining before the slipstitch detailing, in case blocking required more stretching and persuasion than the slipstitching would allow. And... oh man, the joining. I won't lie, the blanket very nearly got tossed off the balcony a few times! 

After doing a practice join 4 times, having it not sit even close to flat each time, and frogging whilst doing lots of swearing, I reached out to the designer for help. Kaye kindly sent me some higher quality, more detailed photos of the joins, which really helped. Thanks Kaye! I am hoping she will add those photos to the pattern as well so that future crocheters will have an easier time of it. The key was giving up any expectation I had of being able to do it evenly and regularly, and embracing the fudge. I do not like fudgy crochet.


After a preliminary block (just with water, which did very little), I worked the slipstitch detailing on the double spirals and the mini-spirals that fill the space between the double spirals. Using one colour cut down on the ends, but it still took a long time, and many many many more ends. I need a new yarn needle as all the silver has come off!! 


Final blocking time! I read up online about steam blocking acrylic, as this blanket was going to need some pretty intense help to get it to sit even vaguely flattish. I borrowed my Mum's steam iron, washed the blanket, slithered around on the floor on my stomach getting it all viciously pinned out, and started steaming... and brown lumpy goop splattered out along with the steam. Plus, it seemed to all be rising rather than going into the blanket. It was time for some creative thinking! 

My husband sprayed the blanket generously with cool water, and we let it soak in for a while. Then I put on a podcast, stuck my headphones in, and let rip with the hairdryer on high, moving slowly across each section until they felt warm and less damp under my fingers. We then left it all pinned out and went away for the Easter long weekend... 


And, it worked! The edge is still frilly (but was impossible to block, so I'm calling that a feature), and it's not 100% flat but looks much less like a coral reef! 


The slipstitching looks so good contrasted with the royal blue joining colour, and really brings it all together.

So, in summary: I'm glad I made this once, but I am in no hurry to make another one!

Friday, 22 May 2015

PATTERN: Tension Finger Saver

I am usually a pretty loose crocheter. My sister and I can both make exactly the same pattern, and mine is usually much much bigger than hers! 

But, for some projects, I find that tight tension is essential for the correct look or size. Maintaining that sort of tight tension is difficult, especially when I start to get serious dents and burn marks across my middle finger where the yarn runs across! 

I came up with this little tension finger saver using hardy 4 ply cotton, and it has done wonders for my poor hands when crocheting with tight tension :) 


------------------------------------------
PATTERN: TENSION FINGER SAVER
------------------------------------------

This pattern uses all US terminology. It is worked in a spiral rather than joining each row and then moving up.

Materials
Small amount of 4 ply cotton
2.25mm/B hook 
Scissors
Yarn needle

Instructions

Row 1: Using foundation single crochet stitch (fsc), 15fsc (or however many you need to fit snugly around your problem finger). It needs to be quite a firm fit, so that it doesn't spin around your finger with the yarn, but not so firm that it cuts off the blood supply!

Row 2: Insert your hook back through the first fsc and do a normal sc. sc in each stitch around (15sc)


Rows 3-9: sc in each stitch around (15 sc) 

To finish: Slip stitch into the next stitch. Fasten off and cut yarn. With starting end, slip stitch into final fsc and fasten off. Weave in ends.


There you have it! I ended up making two - one for my middle finger and one for my little finger to save them from dents and burns making the cutest happypotami :) 


Friday, 19 December 2014

PATTERN: Double Spiral Clutch

Hello everyone! 

You're lucky enough to have me twice this week, as Anne is on holidays in Sweden for her birthday :) Comment with some birthday love for when she gets home!

We really do appreciate your reading our little blog, especially at this very busy time of year. Your views, likes and comments give us a little thrill every time :) 

For the last week or so I've been dreaming about what to do with my Double Spiral Square Motif. Afghan? Too time consuming to be able to blog about today. Market bag? Too many colours to choose from, plus I want to make a nice big one :P Bright pink and black clutch? BINGO! 

Here is how I made it, in very basic terms. I would also love to hear what you are thinking of doing with this motif! 

Queue or favourite this pattern for later on Ravelry here: http://www.ravelry.com/patterns/library/double-spiral-clutch 

-----------------------------------------
PATTERN: DOUBLE SPIRAL CLUTCH
-----------------------------------------

Yarn: 8 ply 100% acrylic, two colours (Pink Variegated and Black)
Hook: 3mm

Step 1

Make 6 Double Spiral Square Motifs, 3 with Pink Variegated as Colour A and Black as Colour B, and 3 with the colours reversed.


Step 2

Stitch motifs together in groups of 3. I used a zipped ladder stitch (tutorial here) so that the joins were invisible, and the motifs sat squarely next to each other. You could definitely whip stitch or crochet the motifs together if you want to get a different kind of look :)


Step 3 

2 rows of single crochet (US terms) in Black around each panel of 3 motifs. I continued using the same cornering technique as in the motifs, alternating (2sc, 1hdc) (1hdc, 1sc) and (1sc, 1hdc) (1hdc, 2sc) in the hdcs on each corner.


Step 4

Make strap: Foundation single crochet enough stitches to get a strap length that suits you. Remember the strap goes all the way around the bag. 

If you're not comfortable with the foundation single crochet stitch, go up to a 4mm hook and do enough chain stitched to get a strap length that suits you. 

Join to first fsc, ch1 and sc all the way around. Do another rows of sc in black (1fsc row, 2sc rows or 1ch row, 4sc rows in total). Change colours, do two rows of pink variegated sc. Change colours again, and do 4 rows of sc in black. Finish and weave in ends.


Step 5

Pin strap to motif panels, making sure the join in the strap is at the bottom of your bag. Slip stitch motif panels to strap with pink variegated yarn. Weave in all your ends, and ta-dah! A Double Spiral Clutch!


Just the right size for two of my favourite books :) 


I wish you all a very merry Christmas, and hope that you are able to rest and relax a bit over the holidays! I'll be back before New Years with an update from the lake :)

Tuesday, 16 December 2014

PATTERN: Double Spiral Square Motif

Hello everyone, and welcome!

This is our 100th blog post! Thank you all for reading and supporting us! We love all your comments and shares and saves on Bloglovin :) 


And as a special present just for all you wonderful readers, here is my brand new pattern (with photo tutorial): The Double Spiral Square Motif!! As you know, I'm a bit mad on spirals. After I did the translation of Patty Crochète's gorgeous Solid Spiral Granny Square, my lovely friend Angela from Get Knotted Yarn Craft sent me this picture of a doona cover, and suggested that maybe the solid spiral granny could be converted to make this double spiral square:


What an idea! I spent way too many hours and brainspoons figuring out how to do the spiral with two colours instead of four, and then how to connect opposite ends of the squares to make it spiral like this... and here it is, with a photo tutorial! It has only been lightly tested, so please let me know if something is unclear, or needs more information/photos :)

What could you do with this motif? The sky's the limit! I can see two of them sewn together and lined to make a little pencil case; or stitch a whole bunch together to make an afghan; or as an accent row in a groovyghan; or as a square-ish market bag... So many options! 

Add it to your Ravelry queue or favourites here: http://www.ravelry.com/patterns/library/double-spiral-square-motif

============================
PATTERN: DOUBLE SPIRAL SQUARE MOTIF
============================

Materials:
Two colours of yarn (Colour A and Colour B)
Hook, size appropriate to yarn
Scissors
Yarn needle

All stitches are in US terminology
sl st = slip stitch
ch = chain stitch
hdc = half double crochet
dc = double crochet
tr = treble crochet

Notes:
- The square spiral is made by alternating forward and reverse (1dc, 1tr) (1tr, 2dc) stitch sequence in the corners. This pattern makes a specific size - refer back to the Solid Granny Spiral Square pattern for information on how to make it bigger!
- Drop yarn means to pull up a large loop of the yarn, and let it go to start working with a different colour. When you go back to your large loop, pull it tight before continuing.
- All stitches are worked into the top of the stitch below, not into the space between stitches, unless otherwise specifically stated.


1. Making each spiral square:


In colour A ch5.  Sl st into first chain to form a ring. 


Ch 3, into ring (2dc, 2tr, 3dc, 2tr, 3dc). Pull up large loop of yarn and drop colour A.


Using colour B join into ring. Ch 3, 2 dc into ring.  Into 3 ch loop of colour A, (dc, 2 tr, dc). dc into next 2 dc. In next tr (dc, tr). In next tr (tr, 2 dc). dc in next 3 dc. In next tr (2dc, tr). In next tr (tr, dc). Pull up large loop of yarn and drop colour B.


Pick up colour A. With colour A, in 3 ch loop of colour B, (dc, 2 tr, dc). dc in next 3 dc. In next tr (dc, tr). In next tr (tr, 2 dc). dc in next 4 dc. In next tr (2dc, tr). In next tr (tr, dc). dc in next 7 dc. Pull up long loop of yarn and drop colour A.


Pick up colour B. dc in next 4 dc. In next tr (dc, tr). In next tr (tr, 2dc). dc in next 5 dc. dc in next tr. 2dc in next tr. Cut off, pull end through.


Pick up colour A. In next tr (dc, tr). In next tr (tr, 2dc). dc in next 6 dc. In next tr (2 dc, tr). Pull up long loop of colour A, cut end, leaving very long tail (approx. 60cm).


Make two spiral squares in the same way.

2. Joining spirals

Lay out your squares according to the picture below. You should have one Colour A yarn at the top on one side, and one on the bottom on the other side.


**With colour A tail, tr in next tr. Slip-stitch into the top of the last stitch of colour B on the other square. 


In same tr, dc, then slip-stitch into the top of the second-last stitch of colour B. (dc in next dc, slip-stitch into top of next colour B stitch) x4.**


Repeat **to** with colour A loop at the other end of the join.


I found it easier to pull the yarn through to the top of the work rather than try and grab it through the gap.


Ta dah!


Finish both Colour A threads & weave in ends. To tighten up the tiny gap between the finishing points, weave the end into the opposite side (so in the same direction as you were already going).


3. Outside row

Using colour B, join to either of the Colour B sideways dc stitches. Then, 2ch, 2hdc in the same space.


**hdc in next 9 dc (don't forget the stitch that the sideways dc is made in). 


In next tr (1hdc, 1dc). In next tr (1dc, 2hdc). hdc in next 9 dc. In next tr (2hdc, 1dc). In next tr (1dc, 1hdc). hdc in next 10 dc. hdc in next 2 tr. **

3hdc in next Colour B sideways dc stitch.  Repeat ** to **. Sl st in top of first ch2, cut off and pull end through.


Weave in all your ends. 

Tuesday, 21 October 2014

PATTERN: Saggy Daggy Crochet Baggy

I used the practice and tutorial Solid Spiral Granny Squares to make up a Saggy Daggy Crochet Baggy for a friend to use as a project bag :P What do you think? 

Instructions for how to make this bag for yourself are below, or you can visit the Ravelry page for this pattern to save it to your queue or add to favourites! :)  


Instructions for how to make your very own Saggy Daggy Crochet Baggy:

1. Make 5 Solid Spiral Granny Squares with two full rounds of each colour (so {step 4, step 5} x 3. You can use other square patterns, just make sure you end up with 30 stitches on each side. 

2. Join Colour E (edging colour) in any dc and sc around each square. In the corners, do two sc in the last stitch of a row, and 3sc over the dc at the start of the next row.


4. Using Colour E and sc, join 4 of the squares into a line, then join the first square to the last one to make a circle (or box). 

5. Using Colour E and sc, join the 5th square to the edges of your circle. Don't forget to do 3 sc in each corner to keep it square! Now you have a cube with no top :) 


6. Join Colour E in one corner of the top of the bag and sc all the way around, using slip stitch to join. Don't cut off Colour E.

7. On the next round with Colour E, ch 1 (does not count as a stitch), then sc in the next 10 stitches. For the handles, you can either use 20 chain stitches, or 20 foundation sc stitches. Skip 12 stitches on the previous round, then sc 10 to the corner. Repeat for all four sides, then cut off Colour E.

8. Do one round each of sc in Colour A, then B, then C, then D, then E to finish. 
If you did chain stitch for the handles, do the first round (with Colour A) into the stitches to make it nice and strong :) In the picture below, I've used foundation sc to make a more defined handle hole.


9. Weave in all your ends securely.

Ta-dah! Your very own Saggy Daggy Crochet Baggy :) 

If you have any problems with these instructions (which were written up very quickly, and not tested), let me know in the comments!


Monday, 20 October 2014

PATTERN: Solid Spiral Granny Square (translated from Patty Crochète)

In my hunt for something to do with my beyoooootiful Stylecraft Special DK yarns, I have scoured the internet for ideas, patterns, inspiration - something that will show off this yarn to its fullest. 

I love rainbows, and in my travels around the web the same picture kept coming up for rainbow granny spirals: The Granny Spiral by Patty Crochète. This was it, the one. It was calling me.  


One small problem - the pattern is written in French (although with an excellent photo tutorial) and I could not find a proper English translation anywhere! Google Translate helped a bit, as did some excellent Googlefu (and proper reading) from the ladies in the Creative Crochet Crew group on Facebook. I really believed there was a market for this pattern in the English speaking world, especially as I had seen it in so many places, on so many Pinterest boards and inspiration boards.

The incredible designer of this square, Patricia Damême, can be found on her blog here, her Facebook page here, and on Pinterest here, and I absolutely recommending checking her out in all of those places as her work is just amazing.

With her permission, the English translation of the Solid Granny Spiral Square :D, which is also available on Ravelry for easy queueing or favouriting for later! 

--------------------------------------------------------------------
PATTERN TRANSLATION: SOLID GRANNY SPIRAL SQUARE
Translated from: The Granny Spiral by Patty Crochète
Ravelry Link: http://www.ravelry.com/patterns/library/solid-spiral-granny-square
--------------------------------------------------------------------

Abbreviations (US terms):
ch = chain stitch
dc = double crochet
tr = treble crochet
sl st = slip stitch

You'll need 4 colours of the same weight yarn.


Notes:

* All stitches are worked in the top of each stitch of the previous row, not between the stitches, unless otherwise specified. You could do an interesting variation with using back loops only, or both loops for a smooth finish.

* I don't recommend using the Magic Circle to start this square, as it makes the square rows twist a bit. 

* As you stop working with each yarn, pull up a nice big loop or use stitch markers so you don't accidentally undo all your lovely work

* To stop your yarns getting tangled, at the end of each sequence of four colours turn your work ANTI CLOCKWISE to get back to the first colour. If you keep turning the same direction, you'll get an awful mess.


* If you get lost in the Steps 4 and 5 repeats, just remember that in each colour, the (dc, tr) (tr, 2dc) and (2dc, tr) (tr, dc) sequences alternate - just check what you did last corner! The current corner should also be the opposite to the one directly underneath.


STEP 1
With Colour A, ch 5, sl st into 1st ch to form a ring. Ch 3, 2dc into ring. The 3 chain of each colour is the loop you'll need in Step 3.


STEP 2
With Colour B, **join to ring. Ch3, 2dc into ring.** Repeat ** to ** for Colours C and D. 


STEP 3
With Colour A, **(dc, 2tr, dc) into 3ch loop of next colour.** Repeat ** to ** for Colours B, C and D. 


STEP 4
With Colour A, **dc into each dc of the previous row. In 1st tr of previous row, (dc, tr). In 2nd tr of previous row, (tr, 2dc).** Repeat ** to ** for Colours B, C and D.


STEP 5
With Colour A, **dc into each dc of the previous row. In 1st tr of previous row, (2dc, tr). In 2nd tr of previous row, (tr, dc).** Repeat ** to ** for Colours B, C and D.


STEP 6
Repeats Steps 4 and 5 until you get to one row short of your desired size.


STEP 7
To Finish: With Colour A, **dc in each dc, dc in 1st treble, dc in 2nd treble. Cut your yarn, leaving a tail for darning in, and pull through the loop on your hook. Weave in end.** Repeat ** to ** for Colours B, C and D.


And that's it! Ta-dah!

Update: I used the practice and tutorial squares to make up a Saggy Daggy Crochet Baggy - check out the photos here