
While creating this pattern, I wanted to start it with a foundation half double crochet stitch (half treble for UK readers). This way of starting a project is almost magic - no acre-long chains, no fiddly trying to crochet into chains... perfect for me!
But I just couldn't do it! I watched videos on youtube, looked at photo tutorials, read descriptions... and it still took me about 2 hours to get a row of it done correctly! I can only assume that there are others in the same boat as me, so here is my first ever crochet stitch photo tutorial!
-----------------------------------------------------------------------------------------
FOUNDATION HALF DOUBLE CROCHET - PHOTO TUTORIAL
1. With your hook and yarn, start with a slip knot.


2. Do 3 chain stitch.

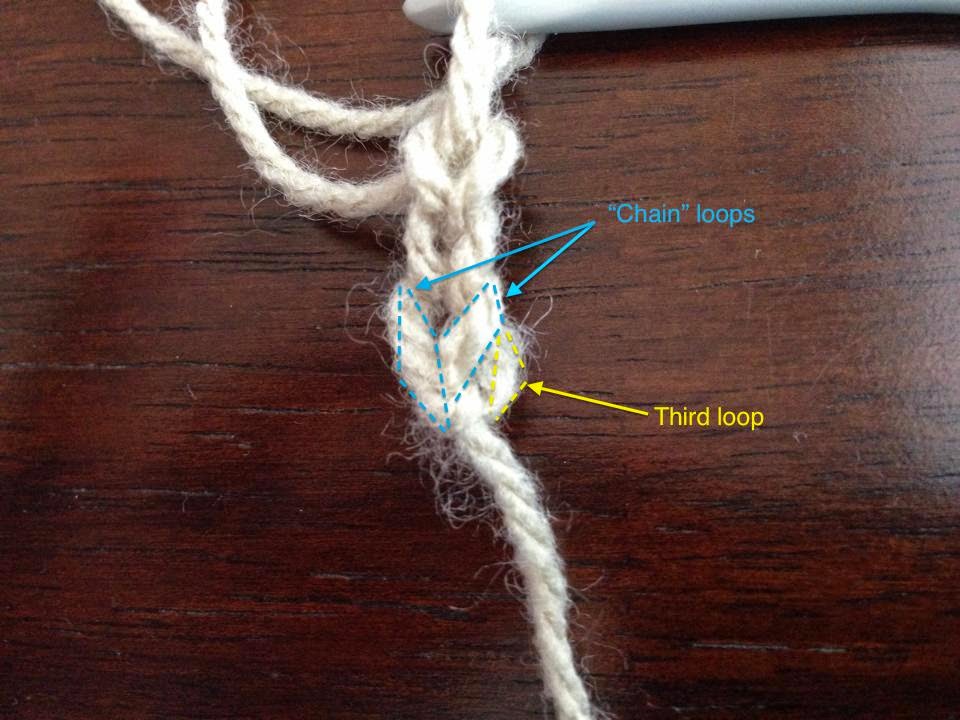
3. Now, look carefully at your first chain stitch (3rd from your hook). There are three threads - the "chain loops" and the "third loop" - I've marked them on this photo for you. You need to yarn over hook, then insert your hook from front to back through the "chain loops".

4. Yarn over hook, and pull it back to the front - now you have three loops on your hook.

5. Now the magic begins! Yarn over hook, and bring it through ONLY THE FIRST LOOP, like the photo below. This creates the chains to mimic a foundation chain starting row.

6. The next step is to make the half double crochet stitch - yarn over hook again, and pull through ALL THREE LOOPS. Tada! You've made your first foundation hdc stitch!

7. This is the part where I was coming undone in other tutorials - where do you put your hook through to start the next stitch? Well, here you go! If you turn the work over so you are looking at the underneath (the "chain" part), you'll see a group of loops. I've labelled with blue arrows which are the "chain loops" that you need to stick your hook through.

Yarn over hook, put your hook through those loops from front to back.

Now yarn over hook, and pull through the "chain loops". You'll have three loops on your hook again.

8. Just like the first time, yarn over hook and pull through the FIRST LOOP only, to create the "chain" section of the stitch.

9. Then, yarn over hook and pull through all three loops to create foundation hdc #2!

10. Turn you work over again to look at the "chain" side of things. See the next two chain loops that you need to put your hook through to start the next stitch? I've labelled them with blue arrows below :) They look a little twisted - that is ok, it's because I twisted the hook to get a better photo! In the second photo, you can see that the loops aren't actually twisted at all ;)


When you are looking for the next chain loops, make sure you don't pick up the "third loop" by accident! I've spread the threads out a bit and labelled them below. If you start using the "third loop", your chain side will look a bit strange!

Once you've got the hang of it, continue on in the same way:
FOUNDATION HALF DOUBLE CROCHET STITCH - SUMMARY
STEP 1: Yarn over hook, insert hook front to back through chain loops of last stitch, yarn over hook, pull back through chain loops (3 loops on hook).
STEP 2: Yarn over hook, pull through 1 loop ("chain") (3 loops on hook).
STEP 3: Yarn over hook, pull through 3 loops ("hdc").

Wow looking forward to seeing your designs! thanks for the tutorial, I've never quite got my head round this so will have to try again :)
ReplyDeleteThanks Helen! Let me know how you go?
DeleteBonjour!
ReplyDeleteThis tuto will be useful for me!
Have a nice day!
Oh good! Let me know how you go, if you try it!
DeleteSNAP! Great minds think alike! It is a coincidence that we have both been working independently on the same topic lately - foundation stitches or extended stitches.
ReplyDeleteI like your photo tutorial. YouTube videos move too quickly for me to study the stitches properly.
Your design activity sounds exciting. Watch this space, heh? ;-)
Have fun! xxx
Ooh I'll have to keep an eye out for yours! I agree with you about youtube videos - either they zip along at an alarming rate, or they go so slowly that I get bored before they get to the actual stitch...
DeleteHi Michelle! Thanks for making a tutorial! As you say, most people don't realize the amount of time and trouble the writer has gone into! I really appreciate it. Even if I might not actually need this today, I know that I read it and can come back to it when I need it. Clear photos and explanations can be such a life saver! So, I'm saying thanks! :)
ReplyDeleteIngrid xx
http://myfunkycrochet.blogspot.be
Thank you so much Ingrid! Let me know how you go, if you do need this stitch in the future?
DeleteYay! Finally had a chance to study this properly and I think I have it. :) many thanks!
ReplyDeleteyour work are so nice
ReplyDeleteVery informative
ReplyDelete