You can download the final Part Six of the Carousel Crochet-Along, designed by Sue Pinner and hosted by Stylecraft Yarns from the Stylecraft website NOW, in English (US and UK), German and Dutch.
Only one tip this week - you'll need about 40g/110m of yarn for the last row, so consider starting a new ball if you have less than that available in the ball you've already started. Enjoy finishing your masterpieces! I took lots of photos of my Batik DK and Special DK Carousels - I am so happy with the end product!
For the Special DK Carousel, I finished with a round of crab stitch (or reverse sc) instead of the edging pattern.
And then I had some fun with my HeidiBears animals - it's Circus Time!
Thank you all so much for coming with us on this journey :) We hope we've helped smooth the way on your Carousel, and you enjoyed it as much as we did!
Nearly there! Our Carousel blankets are getting huge now :D Good for those of us in the Northern Hemisphere, but here in Australia summer is getting started, and working these gorgeous blankets is a bit hot! Part Five of the Carousel Crochet-Along, designed by Sue Pinner and hosted by Stylecraft Yarns has just been posted, and is available to download NOW from the Stylecraft website, in English (US and UK), German and Dutch.
If you haven't set up a Ravelry project yet, the pattern page can be found here: http://www.ravelry.com/patterns/library/carousel-cal We are working the CAL along with you all, and will post our tips and tricks for each part at the same time as the pattern is published over at the Stylecraft website.
Please feel free to ask any questions in the comments or on our Facebook page (https://www.facebook.com/crochetbetweenworlds/) - we are here to help you. Anne is doing the German translations for the CAL again, so ask away in German too!
Part Five, the Ripple Border:
Our top tips for the Ripple Border are:
1. Colour charts! I've created them again for the Ripple Border to make the colour lists easier to read and follow. Download your required colour chart from these links:
3. Yes, it looks like a big gap when you skip stitches in round 1! But count and you'll see that you're only skipping two dc :)
4. I did a different colour change method for each blanket - in the Batik I followed Sue's instructions to the letter, and in the Special DK I completed the last dc, and then changed colour. They sit slightly differently to each other; maybe do a test and see which you like better?
We hope these tips help you!
Check back here in two weeks on Tuesday 15 November for Part 6 - the Edging :D
I hope you all enjoyed the Pentagons a fortnight ago! This week we go one side better and make Hexagons :P Part Four of the Carousel Crochet-Along, designed by Sue Pinner and hosted by Stylecraft Yarns has just been posted, and is available to download NOW from the Stylecraft website, in English (US and UK), German and Dutch.
If you haven't set up a Ravelry project yet, the pattern page can be found here: http://www.ravelry.com/patterns/library/carousel-cal We are working the CAL along with you all, and will post our tips and tricks for each part at the same time as the pattern is published over at the Stylecraft website.
Please feel free to ask any questions in the comments or on our Facebook page (https://www.facebook.com/crochetbetweenworlds/) - we are here to help you. Anne is doing the German translations for the CAL again, so ask away in German too!
Part Four, the Shaped Hexagons:
Our top tips for the Shaped Hexagons are:
1. The Hexagons provide more practice for everything we've learned so far: padded centres, standing stitches, numbered pieces, join-as-you-go... I've linked our previous Tips posts below, and recommend having a flick through before you start your Hexagons.
2. Colour charts! I've created them again for the Hexagons to make the colour lists easier to read and follow. Download your required colour chart from these links:
(to use find/replace if you are using different colours)
3. After Row 4 your hexagons will curl up. That's ok - it will flatten out again as you get further out.
4. If you're using the little paper numbers to keep track of which piece is which, you can save on stitch markers (and moving them every row) and pin them on the hexagon towards the outside point once you've done Row 5.
5. I got to rewrite the joining instructions for this part, so hopefully they are easy to follow!
You'll be joining to other shapes on all sides (so no awkward band joining), and if you get lost just remember - slip stitch into the adjoining stitch on the sides of each hexagon, and in the corners, replace chains with slipstitches into adjacent corners. For a little extra help, I made this short video showing how I joined the Hexagons in. Totally unofficial and not approved by Sue or Stylecraft, but hopefully it will help you visualise the instructions :)
We hope these tips help you! Check back here in two weeks on Tuesday 1 November for Part Five - the Ripple Border :)
Part Three of the Carousel Crochet-Along, designed by Sue Pinner and hosted by Stylecraft Yarns has just been posted, and is available to download NOW from the Stylecraft website, in English (US and UK), German and Dutch.
If you haven't set up a Ravelry project yet, the pattern page can be found here: http://www.ravelry.com/patterns/library/carousel-cal We are working the CAL along with you all (Anne in the new Batik yarn, and Michelle in Special DK, and will post our tips and tricks for each part at the same time as the pattern is published over at the Stylecraft website. Anne is still catching up after her holidays :) Please feel free to ask any questions in the comments or on our Facebook page (https://www.facebook.com/crochetbetweenworlds/) - we are here to help you. Anne is doing the German translations for the CAL again, so ask away in German too! Part Three, the Pentagons: Note: All the below tips use US terminology.
Our top tips for the Pentagons are:
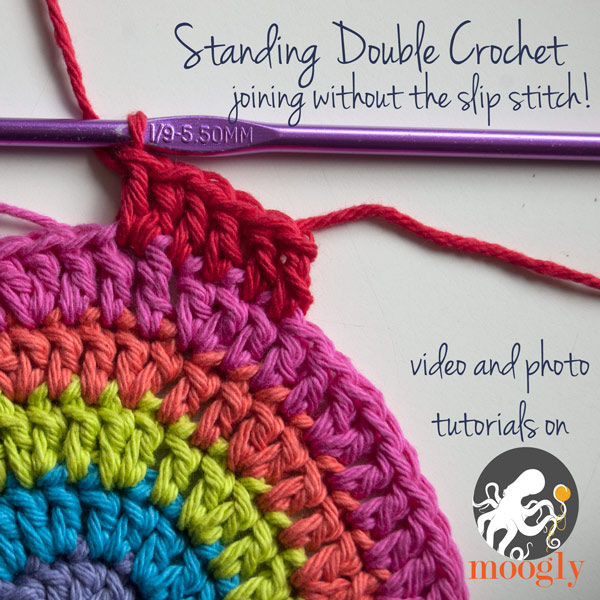
1. Yep, I'm recommending standing stitches again!
For these cute little pentagons, you'll mostly need the joining standing stitch rather than the stacked one, as you change colour for each row.
2. Finding the colour lists hard to follow? I've made a handy table for the colours of each row for each pentagon, in both yarn types, that you can download here:
If you're using other colours, you can download the Word doc tables and find/replace with your colour plan here: Part 3 - Pentagons - Word Doc (both yarns) 3. To keep track of colours whilst working a round at a time on each pentagon (so if you prefer to do all the Round 2, then all the Round 3, etc), pin a little piece of paper with the pentagon number into the centre of each piece! You can then leave the pinned paper attached to the middle for as long as you like - as you can see in my finished picture at the top of this post, I left them on until all were joined in.
I used sewing pins because I like to live dangerously, but it would probably be safer and less owwie if you used little safety pins. 4. Join Pentagon 1 to a Cream band! Then, as you go around, you'll be joining the Cream pentagon to a Lipstick/Cherry band, and the Lipstick/Cherry pentagon to a Cream band :) 5. The Join As You Go method of joining is fabulous - no sewing! In case you're not experienced in this yet (and you will be by the end of this beautiful Carousel), here's what I did, which might help you. NOTE: THESE TIPS MIGHT BE A BIT DIFFERENT TO WHAT BABS DOES IN THE VIDEO AND MAGGIE DOES IN THE CHARTS. It's up to you how you want to do the joining. First Pentagon - The instructions are lovely and detailed for this first join, you shouldn't need any help from me!
Second - Fifteenth Pentagons Side 2, First Joined Corner: after the dc in the corner space of the pentagon you're doing the final round of (we will call this PentagonA), do ch1, then slst into the corner space of the pentagon you're joining to (PentagonB from here on). Ch1 again, then do your second dc into PentagonA. (slst into corresponding dc of PentagonB, dc into next st of PentagonA) to the end of the row, and then slst into the second last dc of PentagonB, dc into corner space of PentagonA, slst into last dc of PentagonB.
Side 3, Second Joined Corner: slst into corner space of PentagonB, ch1, slst into first st of banding strip.
dc again in corner space of PentagonA, then (slst into next dc of banding strip, dc into next dc of PentagonA) to the end of the row.
dc into the corner space of Pentagon A, slst to the last st of the banding strip, ch2.
Then, continue finishing off the last row of your pentagon as normal :) Sixteenth Pentagon Side 2, First Joined Corner: same as above. Side 3, Second Joined Corner: same as above. Side 4, Third Joined Corner: dc into corner space of PentagonA, slst to the last st of the banding strip, ch1.
Then, slst to the corner space of the first pentagon you joined (We'll call this PentagonC for ease of reference). dc into the PentagonA corner space again, slst to the first dc of PentagonC. (dc into next st of PentagonA, slst into next st of PentagonC) to end of row.
Side 5, Fourth Joined Corner: dc into corner space of PentagonA, slst to the last st of the row of PentagonC. ch1, slst into corner space of PentagonC, ch1, then finish off the last row of PentagonA as normal.
We hope these tips help you! Check back here in two weeks on Tuesday 18 October for Part Four - the Shaped Hexagons :)
The last week has gone so slowly, but Tuesday is finally here again!! Part Two of the Carousel Crochet-Along, designed by Sue Pinner and hosted by Stylecraft Yarns has just been posted, and is available to download NOW from the Stylecraft website, in English (US and UK), German and Dutch.
If you haven't set up a Ravelry project yet, the pattern page can be found here: http://www.ravelry.com/patterns/library/carousel-cal We are working the CAL along with you all (Anne in the new Batik yarn, and Michelle in Special DK, and will post our tips and tricks for each part at the same time as the pattern is published over at the Stylecraft website. Anne is on holidays this week, so we will catch up with her Batik Part Two next time :) Please feel free to ask any questions in the comments or on our Facebook page (https://www.facebook.com/crochetbetweenworlds/) - we are here to help you. Anne is doing the German translations for the CAL again, so ask away in German too! Part Two, the Red & Cream Banding:
Our top tips for the Red & Cream Banding are: 1. Use foundation stitches to start each panel instead of chains! It is then a bit more chunky down the bottom to join, but I find it so much easier to work. Here's our picture tutorial for the foundation hdc: http://crochetbetweentwoworlds.blogspot.com.au/2014/09/tutorial-foundation-half-double-crochet.html The only difference for a foundation dc is rather than pulling through all three loops at the end of the stitch, you pull through the first two and then the second two (like a normal dc stitch).
2. Instead of chains at the start of each row, try the stacked standing dc! This also makes the panels easier to join at the end ;)
Stacked Standing dc: sc into target stitch. Insert hook under two leftmost strands of sc, yarn over hook to do a second sc.
3. If you're like me and can't mentally deal with instructions like "evenly join" or "freeform", here's a cheat way to make sure all your panel joins are neat and even: 2sc in the side of each stacked standing dc (there are conveniently two top v's up the side of a stacked standing dc) + 1sc in the side of each normal dc, plus an extra sc at the bottom (for the straight sides) or top (for the increase sides) = 25sc!
Plus, if you're using standing stitches to start, do NOT replace the chain join at the beginning of the join row with an sc - it looks wonky and messes up the stitch counts. Just slst join to the very bottom of the first panel and slst in the very bottom of the second panel to begin. If you're totally cool with making it work free form every time, I take my hat off to you! 4. When you're weaving your ends in, do it in and around the tops of the stitches on the front.Because the stitching is zig-zagging back and forth along the join, just catching the yarn ends in the same stitching on the back will be visible. See in the photo below, you can't even really see where the ends are stitched in on the front (well you sort of can, but it's less obvious than a gold thread running along between red and cream)!
We hope these tips help you! Check back here in two weeks on Tuesday 4 October for Part Three - the Pentagons :)
It's CAL time again!!! Part One of the Carousel Crochet-Along, designed by Sue Pinner and hosted by Stylecraft Yarns has just been posted, and is available to download NOW from the Stylecraft website, in English (US and UK), German and Dutch.
If you haven't set up a Ravelry project yet, the pattern page can be found here: http://www.ravelry.com/patterns/library/carousel-cal We are working the CAL along with you all (Anne in the new Batik yarn, and Michelle in Special DK, and will post our tips and tricks for each part at the same time as the pattern is published over at the Stylecraft website. Please feel free to ask any questions in the comments or on our Facebook page (https://www.facebook.com/crochetbetweenworlds/) - we are here to help you. Anne is doing the German translations for the CAL again, so ask away in German too! Part One, the Centre Motif:
Batik (Anne)
Special DK (Michelle)
Our top tips for the Centre Motif are: 1. At the beginning, do your 10 finger wraps around your pinky finger! This will keep the hole in the middle not too big. It might take a little bit of practice!
It's also quite difficult to shuffle your stitches around this chunky magic circle, so try and crochet the 16 stitches evenly around your circle. The effect is great though! 2. Try using standing stitches! They look much nicer than starting each round with chain stitches, and are easier to join into at the end of the round :)
Stacked Standing DC (US) / tr (UK) (this one is for when you're continuing with the same colour in the next Round - the others only work with new yarn) sc into target stitch. Insert hook under two leftmost strands of sc, yarn over hook to do a second sc.
3. The neatest way I could find to close the Popcorns in Round 3 was to do the slip stitch into this loop of the first dc (picture is facing the back of the round):
This is what worked for me - you might have done it a different way :) There's no rules as long as it comes out looking nice! 4. Row 3 will look a bit wibbly when you finish it, and that's ok. The waviness will sort itself out in the next few rounds!
5. If you're using standing stitches, you'll need to get your yarn across to the next ch5 space in Round 7. After finishing Round 6, I did (ch1, slst in next sp, ch1) and then proceeded to a stacked standing dc to replace the ch2 up to start Round 7.
We hope these tips help you! Check back here next Tuesday 20 September for Part Two :)