Showing posts with label Stylecraft. Show all posts

Sunday, 22 May 2022

Stylecraft Blogstars Garden Party!

Hi everyone!

It's been an age - racing around after tiny people certainly doesn't allow much time for blogging, or crafting, or... well, pretty much anything else. Allie is 4 years old today, and the time has absolutely flown! 


We were so excited when Stylecraft and the Blogstars suggested a Garden Party for the Queen's Platinum Jubilee this year - we hope you visited JosieKitten's blog for her gorgeous Macaron circular cushion pattern on Friday! 

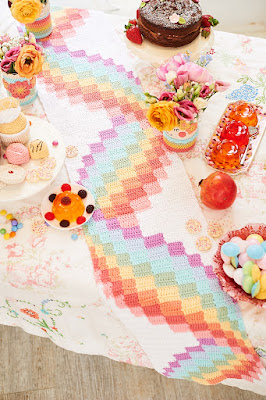
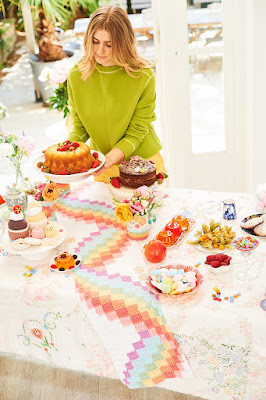
The Garden Party concept was just the creative spark we needed to put together a new design in our Bargello series. This is our Bargello Ribbon Table Runner (all photos in this post credit to Stylecraft Yarns and their amazing photography and design team). 

I've had this design mumbling around in the back of my head for ages, but just haven't had time to activate my almonds and get it out of the brain and into some yarn. It's based on a quilted bargello table runner that my mum has in a glorious patchwork pattern book, but in a pastel rainbow. I love the illusion of the ribbon twisting around itself up your table!

As with our existing bargello patterns, I'm not going to lie - the style of writing the pattern is a bit strange. Please know that I tried as many different ways of writing the pattern as I could think of, and this was the clearest! I encourage you to read it all (even the boring introduction bit), and watch the videos linked in the pattern, and always reach out (on social media, or by email to wrappedwithlovebymichelle@gmail.com is more reliable than commenting here) if you need a hand to get going. The pattern has been tested by three crocheters of varying skill levels, and the text independently reviewed. 


A plus for purchasers between now and December 31, 2022 - US$2.50 (over half the purchase price after fees) will be donated to The Rotary Foundation's End Polio Now campaign. Rotary has been working to defeat polio for over 35 years now, and worldwide cases have reduced by 99.9% in that time. There are only two countries now where polio is endemic, and ever decreasing numbers of wild polio cases in the world. As a proud Rotarian, I'm honoured to be able to support this very worthy cause. We are THIS CLOSE to ending the scourge of polio worldwide.


And now, the pattern! To view or purchase the pattern on Ravelry, go here:


https://www.ravelry.com/patterns/library/bargello-ribbon-table-runner


Keep bloghopping on 24 May to Janie Crow, who has created some really special decorations for our Garden Party!  

Friday, 28 May 2021

Yarn Review: You and Me!

Hey everybody! 

What an epic year we've had! Life regularly seems close to normal here in Australia, but we are still having outbreaks and mini lockdowns.

In between work and Rotary and now chasing two tiny humans around, I've had some time to try out Stylecraft's (now not all that new) yarn, You and Me. 

In short, I LOVE IT - and definitely not because they sent the first ball to me for free. As proof, I've been back to one of the big online retailers and bought more for myself to make jumpers for the kids. 

I made one of my Impossible Hexagon Sweaters for Allie first, and it came up so rich and warm and sturdy, I can't imagine she will ever be able to wear it out. 


The yarn is an acrylic and cashmere-effect polyamide blend - it feels like it has the strength and stitch definition of cotton, but the warmth of acrylic and just so ridiculously soft and silky. 

I wanted to branch out this year to some different cardigan and jumper designs, and my eyes just about jumped out of my head when I spotted the Jasmine Sweater by Mon Petit Violon... yes yes yes yes yes!

It's taken weeks of scraping out a few minutes here and there, but finally I finished it last night, and couldn't wait to share it here! 


(Please excuse the grubbiness of the model - she had an excellent play with her new textas *eyeroll*) 


I love how the self-striping yarn worked in with the pattern. Often I find that highly textured designs lose all their effect when worked with other than a plain coloured yarn, but this worked really well -  I think it looks a bit like a Monet?


It's so cosy warm too which is fortunate, because it looks like Sydney is in for a very cold and dry winter. 


Check that stitch definition! I did have to fiddle with the pattern a bit to get the sleeves to fit, but I do have a very long skinny bean to clothe. Her little brother seems to be going the same way, although already much bigger than she was at this age. 


Do you have any other toddler/preschooler jumper or cardigan patterns you can suggest for me to try crocheting for this monkey? I'd love to hear your suggestions! 

Tuesday, 21 August 2018

Heartwood Cardi - Winner!

Hi everyone!

Thank you so much for your lovely comments and support of the Heartwood Cardi - I hope you also took the opportunity to have a squiz at the lovely Stylecraft Cabaret colourways ;) 


I ran the random number generator and the winner of 8 balls of Cabaret in the colour of her choice is...

Michelle West (@mitchymushu on Ravelry)

An email is heading your way asking for your address and which colour you'd like :) 

Thank you to everyone who has bought the pattern already - I can't wait to see your Heartwoods!

Monday, 13 August 2018

PATTERN: Heartwood Cardi

Hi everyone!

Gosh it's been a long time - babies really are time sinks... We are all going really well though :) Just look at this little face!


But to today's news! 

Stylecraft is releasing out two new colours of their gorgeous Cabaret yarn today! The new colours are Forest Glade (a mix of glorious greens with gold sparkles) and Underwater Rainbow, and aren't they mutedly gorgeous!? 


To celebrate, I'm finally getting around to publishing my Heartwood Cardi design! You can buy it from Ravelry here: 

https://www.ravelry.com/patterns/library/heartwood-cardi 

(but keep scrolling down for a discount code and a chance to win the yarn to make it!) 

It's modelled here by my lovely friend Samantha in Cabaret Pink Bloom: 


I previously made Lily Chin's Coming Full Circle Vest for myself, but being on the tubby side, for the cardigan to meet around the front it hung down past my knees at the back! As with most of my design inspiration, my questions were - how can I make this work for me? And if I can make it work for me, can I make it work for others as well? 

I started with a similar octagon shape (adapted to make it actually sit flat in the centre) and then rather than continuing to work all the way around the circle after armholes, I just worked shaped rows back and forth on each side. Then, to get the gorgeous collar and length, I worked more rows at the top and bottom. Ta-dah! 


I've made four of these cardigans now - one each for me and three wonderful friends, so I am confident that the measurement and maths works for a few different body sizes. Whilst it was originally designed for chunky me, as you can see it also works for regular sized ladies as well. For the skinny minnies among us, well, you can make the plain circle cardigans short enough not to be swimming in them :P 


!!!!!WIN YARN!!!!!

Because they are wonderful people, Stylecraft are giving 8 balls of the Cabaret colour of your choice to one lucky winner to make the Cardi! 

All you need to do is purchase the Heartwood Cardi pattern by 11:59pm AEST next Monday 20 August 2018, using the code 


CABARET 

and you'll get 50% off and one entry into the draw! It is open to everyone worldwide - all you need to do is have a valid email address and use the discount code CABARET when you buy the pattern, and you'll go into the draw. 

Winner will be drawn on Tuesday 21 August 2018 - go do the thing and win some lovely lovely yarn! 


Sunday, 11 February 2018

Stylecraft Blogstar Meetup 2018

Hi everyone!

Hard to believe it is February already! Didn't 2018 just begin yesterday?! Sometimes I wish time was flying by less fast and unless someone invents the time turner Hermione used in Harry Potter, we will just have to make most of the moments we have and actually notice them!


Something very notice-worthy was the first Stylecraft Blogstar meet up of the year last weekend! Stylecraft invited its blogstars to a meet up twice a year and while we couldn't attend in person (again, no one has invented apparition for us muggles yet...), we joined the others via Skype on Saturday! The lovely people from Stylecraft installed a table microphone this time and thus is was so much easier to hear everyone at the table! 


Over the course of the morning we got plenty of exciting news and background information, talked about social media annnddd got to see the new yarns which will be released this spring! A big box with samples of all these new yarns arrived in Germany and Australia weeks back and after days of just looking at the box, we were finally allowed to dive into it! You see, there was a big sign on it, telling us not to open it before the meeting! Oh the anticipation! Some of the new yarns are released already (have a look here), some others aren't yet and thus we can't tell you about them (except that is is worth waiting for them!). Michelle really loved the new Bambino yarn, while Anne is rather excited about one of the still super-secret yarns. 


(The picture above is from Stylecraft because ... well obviously we weren't there to take the picture ourselves).

There are some really exciting projects coming up over the next year which we Blogstars plan to do together but... it is all a secret for now! Cross your fingers that everything will work up as dreamt up. :) We certainly can't wait for the next meet up in July!

On a side note: Helen from Josiekitten has a bit of fundraising going on at the moment. She is raising funds for the British Heart Foundation in memory of her late husband. When you donate just two pounds, you will get the change to win amazing yarn-y prizes! Have a look at her page, drool about the prizes (there are over 70!) and donate to this worthy cause! 

We can't wait for the next meet up and really hope we can join the others in person one day...

Take care
Michelle & Anne


Wednesday, 18 October 2017

Stylecraft Elements Blog Tour - Jewelled Pebbles Blanket

Hi everyone! 

We are so excited to be part of the Stylecraft Blogstars, and participating in this 2017 blog tour! Hopefully you all visited Polly Plum at Every Trick on the Hook yesterday and entered the yarn pack giveaway there ;)

As you know, we absolutely adore the Stylecraft Batik yarn, and the new Elements yarn is just as pretty and squishy! 


Our chosen pack for the blog tour is called Rainforest, using the Platinum colourway of Elements and matching and contrasting colours Teal, Old Gold, Pistachio, Violet, Plum and Raspberry.


We wanted to do something a bit quirky with this yarn, so developed a pram blanket that finishes about 80cm by 85cm, made from tesselating heptagons and pentagons. You could easily make it bigger with more yarn. 


The blanket is all Join-as-you-go, so no sewing a million motifs together, and we have provided a colour chart of the blanket to help you get the colour spread nice and random! 

And those colours... all we could think of was looking at pebbled pools through the water, with precious jewels instead of boring rock pebbles. Hence, the Jewelled Pebbles Blanket!

Want to win a Rainforest Yarn Pack to make this pram blanket? The giveaway is open until 10am GMT tomorrow!  

a Rafflecopter giveaway

For the next stop on the blog tour and another chance to win a yarn pack, make sure you visit Cherry Heart tomorrow!

All the blogstars are participating in the blog tour, and you can visit them at 

Queue or favourite the Jewelled Pebbles Blanket on Ravelry here:


------------------------------------------------------
FREE PATTERN: JEWELLED PEBBLES BLANKET
------------------------------------------------------


Finished size: 80cm x 85cm

Materials:

One Rainforest Yarn Pack, including:
   4 balls Batik Elements in Platinum
   1 ball each of Batik in:
   - Teal
   - Old Gold
   - Pistachio
   - Violet
   - Plum
   - Raspberry 
4mm/G hook
4.5mm/H hook
yarn needle
scissors 


All Stitches are in US/American terminology

ch - chain stitch
dc - double crochet 
slst - slip stitch

Special Stitches

- Magic Circle (MC) - tutorial here
- JAYG - motifs are only joined in corners, not along sides. Replace one chain of corner with slipstitch into adjacent corner ch space (replace both chains when joining to two adjacent corner ch spaces).


Instructions

Pentagon (all pentagons are made with the Platinum Elements yarn)
Row 1 - MC. ch3, 2dc, *ch2, 3dc* four times, ch2, slst to top of first ch3. (5 x 3dc groups with 2ch between)
Row 2 - ch3. *in next corner space, (3dc, 2ch, 3dc)* 4 times. In first corner space, (3dc, 2ch, 2dc) and slst join to top of first ch3. finish off. (6dc per side).

Heptagon 
Row 1 - MC. ch3, 1dc. *ch1, 2dc* 6 times. ch1, slst to top of first ch3. (7 x 2dc groups with 1ch between)
Row 2 - ch3. *in next corner space, (2dc, 2ch, 2dc)* 6 times. In first corner space, (2dc, 2ch, 1dc) and slst to top of first ch3. (2 x 2dc groups on each of 7 sides)
Row 3 - ch3, dc in same sp. *in corner, (2dc, ch2, 2dc), 2dc in next space* 7 times, omitting final 2dc in last repeat. slst to top of first ch3. finish off. (6 dc per side)

Starting in top left corner, join each shape with JAYG during final row, in corners only. 


BORDER

The first three rows are crocheted in Platinum.

Row 1: Join the yarn in the pentagon on the left side bottom. 1ch and then 1sc into the same stitch. Crochet 1sc into every st, except into the tops of the heptagons and the pentagons. Crochet 3sc into these. At the end of the row, sl st into the first sc. 1ch.

Row 2 + 3: 1sc into every st with two exceptions: a) crochet 3sc into every top of the heptagons and the pentagons b) 2sctog across the 2st at every dip where two pieces very joined. At the end of the row, sl st into the first sc. 1ch. Finish of at the end of row 3. Weave in the ends.

Row 4: The row is crochet like row 2. You will change color in the middle of each side. Use the following color order: Teal, Old Gold, Raspberry, Plum, Teal, Old Gold, Violet, Pistachio. Finish off and weave in the ends.


------------------------------------------------------
Muster: JEWELLED PEBBLES DECKE 
------------------------------------------------------


Maße: 80cm x 85 cm.


Material:

Ein Rainforest Garnpaket. Dieses enthält:

   4 Knäule Batik Elements Platinum

   Jeweils ein Knäul:

   - Teal

   - Old Gold

   - Pistachio

   - Violet

   - Plum

   - Raspberry 

4mm Häkelnadel

4.5mm Häkelnadel

Nähnadel

Schere


Abkürzungen

Lm = Luftmasche

fM = fest Masche

Stb = Stäbchen

Km = Kettmasche


Besondere Maschen

Magischer Kreis – Hier findest du eine Anleitung


JAYG (Join as you go) – Die Motive werden nur in den Ecken verbunden und nicht an den Seiten. Ersetze eine Lm der Ecke mit einer Km in die angrenzende Eckenlücke (ersetze beide Lm mit einer Km, wenn du ein Motiv mit zwei angrenzenden Eckenlücken verbindest).


Anleitung 
(Grafik zur Anordnung der Motive weiter oben in diesem Blogpost)


Fünfeck

(alle Pentagone werden mit Platinum Elements gehäkelt)

Reihe 1: Magischer Kreis. 3Lm, 2Stb, *2Lm, 3Stb* x 4, 2Lm, Km oberste Lm der Anfangs-3Lm. (5 x 3Stb-Gruppen mit je 2Lm zwischen ihnen)

Reihe 2: 3Lm. *in die nächste Ecke: (3Stb, 2Lm, 3Stb)* x 4. In die erste Ecke: 3Stb, 2Lm, 2Stb) und dann Km in die oberste Lm der Anfangs-3Lm. Abmaschen (6Stb an jeder Seite).


Siebeneck

Reihe 1: Magischer Kreis. 3Lm, 1Stb, *1Lm, 2Stb* x 6. 1Lm, Km in die oberste der Anfangs-3Lm. (7x 2Stb-Gruppen with je 1Lm zwischen ihnen)

Reihe 2: 3Lm. *in die nächste Ecke: (2Stb, 2Lm, 2Stb)* x 6. In die erste Ecke: (2Stb, 2Lm, 1Stb) und dann Km in die oberste der Anfangs-3Lm. (2 x 2Stb-Gruppen an jeder der 7 Seiten)

Reihe 3: 3Lm, Stb in dieselbe Lücke, *in die Ecke: (2Stb, 2Lm, 2Stb), 2Stb in die nächste Lücke* x7, überspringe die letzten 2Stb in der letzten Wiederholung. Km in die oberste der Anfangs-3Lm. (6Stb an jeder Seite)

Beginne in der oberen linken Ecke und verbinde die Motive jeweils in den Ecken mit dem JAYG in der 3.Runde (Siebenecke) bzw. 2.Runde (Fünfecke).

Umrandung
Die ersten drei Reihen werden in Platinum gehäkelt.

Reihe 1: Beginne in der unteren linken Ecke. 1Lm und dann 1fM in dieselbe Masche. Häkle 1sc in jede Masche, außer an den Spitzen der Fünf- und Siebenecke. Häkle dort 3fM in die Spitzenmasche. Am Ende der Reihe: Km in die erste fM. 1Lm.
Reihe 2 + 3: 1fM in jede Masche mit zwei Ausnahmen: a) Häkle dort 3fM in die Spitzenmasche der Spitzen der Fünf- und Siebenecke. b) 2fM zus abm in jedem Tal, d.h. dort, wo zwei Motive verbunden wurden. Am Ende der Reihe kM in die erste fM. Am Ende von Reihe 3 abmaschen und Enden vernähen.
Reihe 4: Die Reihe wird wie Reihe 2 gehäkelt, aber du wirst die Farbe jeweils in der Mitte einer Seite wechseln. Benutze hier die folgende Farbreihenfolge: Teal, Old Gold, Raspberry, Plum, Teal, Old Gold, Violet, Pistachio. Am Ende abmaschen und die Enden vernähen.


Friday, 28 July 2017

FREE PATTERN: Origami Mystique Bag!

Hey everyone!

I'm so excited to share this pattern with you! Stylecraft sent me a bunch of their new-ish Mystique tape yarn (one ball of each colour) to have a play with, and as soon as I picked it up, the idea for this bag immediately popped into my head. I wanted to make something with flat, shaped pieces that then folded up like origami (Japanese paper craft) and crocheted together - so now I present the Origami Mystique Bag! Using just 4 balls of Mystique, this lovely no-sew bag is just the right size for 4 balls of Tweedy yarn ;) 


A little bit about the yarn first... Mystique is a non-woven tape yarn, made of polyester and viscose. It looks like a ribbon, and feels like someone put the fabricky-papery stuff hospital gowns are made of through a shredder. Don't let that put you off though - it is super soft, washes well, and crochets very nicely as a worsted/12 ply yarn. 

I have used four different colours as that's what I had and I quite like the ombre effect, but this bag would also be lovely in just two colours, one for each piece!


This is the first completed and published pattern I used my design journal for; it works! :D 


I hope you have as much fun making this bag as I did :) Queue or favourite it on Ravelry here: http://www.ravelry.com/patterns/library/origami-mystique-bag

-------------------------------------------------
FREE PATTERN: ORIGAMI MYSTIQUE BAG
-------------------------------------------------

Finished size: 27cm x 8cm base, 12cm(centre)-20cm high, +65cm strap

Materials

- 4 balls of Stylecraft Mystique (50g each)
- 5mm/H hook and 6mm/J hook
- 1"/2.5cm button
- Large yarn needle
- Scissors

All stitches are in US/American terminology

fsc - foundation sc (tutorial here)
ch - chain
sc - single crochet
slst - slip stitch


Instructions

Make two identical pieces, which we will then fold together to make the origami bag!

(Base)
Row 1: 10fsc. ch1, turn.

Rows 2-39: sc in each sc. ch1, turn.

Row 40: sc in each sc. DO NOT TURN.

(Side panel)

Row 41: ch 41. turn, sc in 2nd ch from hook and then each ch until you get back to the base. sc across end of base. 40fsc (start your first fsc in the side of the last base stitch). ch1, turn.


Row 42: sc in each fsc and sc of Row 41. ch1, turn.

Rows 43-62: skip first sc. sc in each sc. ch1, turn.

[At the end of Row 62 you should have 90sc]

Rows 63-72: skip first sc, slst in second sc, sc in third sc. sc in each sc, finishing in the 3rd last sc. ch1, turn.

[At the end of Row 72 you should have 10sc, and those 10sc will be in line with your base!]

(Strap)

Rows 73-111: sc in next 10sc. Ch1, turn.

Row 112: sc in next 10sc. Finish off.

For Piece 2, do not finish off after Row 112; rather we will join the two strap pieces together. 

Strap Join: Ch1, turn. *sc in next sc, slst into adjacent sc on the end of the strap of Piece 1*. Repeat * to * to the end of the row. Finish off.


Now you have a very long, very strangely shaped single piece of crochet fabric. This photo is just of one piece, before joining the strap.


Edging

With your joining colour, join yarn with an sc in the end of Row 41 (at the corner of the triangle). Sc along the diagonal edge of the triangle, then along the strap, and back down the other side, finishing off at the opposite corner of the opposite triangle. Repeat on the other side.

Time to do some origami!

Construction

Place the two base pieces on top of each other, mirror image (so, you have one side triangle on each end). Pin the bases together to keep them secure while we mess around with the side panels.


Take the corners of the side triangle and pin them to the opposite end of the base. You can put one piece on the outside and one on the inside, or one each way on each side - it's totally up to you. Pin these together as well. Next, take your joining colour and the 6mm hook and single crochet the base and sides together. This is a bit hard going as you're working through 3 or 4 stitches at a time! At the short ends, don't forget to catch the end of the base piece as you work through the folded fabric.


Now we need to join the side pieces together so that your bag can actually hold something! Using the 6mm hook, join your joining yarn with a slst in one corner of the base where a side edge is on the outside. slst the two side pieces together in a straight line up to the middle of your bag. Pull your working loop through to the inside of the bag. The next bit can be a bit tricky - slst the inside edging to the outside layer of the bag, but just using loops on the back so that it doesn't show through to the front. 

Outside

Inside
Repeat on the other side, but this time, before you pull your working loop through in the middle, ch10 and slst to the last slst you did. This creates your button loop! Continue slipstitching the two pieces together along the inside. 


Sew on your button, weave in the ends, and you're done!