Showing posts with label new pattern. Show all posts

Friday, 19 August 2022

FREE PATTERN: Granny 5 Petal Flower Square

Did you participate in Granny Square Day 2022 this week? It's not something I usually do, but on Sunday evening I had some time to myself (!!) while everyone was asleep (!!!) and there wasn't anything else urgent that needed doing (!!!!) so I decided to do a little doodling with my hook and see if I could come up with something a bit different for my contribution. 

Squaring a pentagon can be a bit tricky, but I think I figured it out! The trick was to make 5 pointed flower into a circle first, and then square the circle ;) 


--------------------------------------------------
FREE PATTERN: GRANNY 5 PETAL FLOWER SQUARE
--------------------------------------------------

Finished size: 6" / 15cm 

Materials

Small amounts of Stylecraft Organic Cotton in Buttermilk, Blush, Papaya and Gypsum
4mm/G hook
Scissors
Yarn needle


This pattern uses all US terminology

MC - magic circle
st - stitch 
slst - slip stitch
ch - chain
sc - single crochet
hdc - half double crochet
dc - double crochet
tr - treble crochet
blo - back loop only
flo - front loop only

Directions:

Round 1 (Buttermilk) - make MC, 15dc in MC. finish off. 

Round 2 (Papaya) - join to any stitch with sc. sc in each stitch around, slst to join to first sc. ch1. 

Round 3 (Papaya) - in FLO, [sc, (hdc, dc, hdc) in next st, sc] around. slst to join to first sc. finish off.

Round 4 (Coral) - in BLO of same stitch of Round 2 as you worked the (hdc, dc, hdc) in Round 3, join with sc. [ch4, skip 2 st, sc in next stitch] around, joining with slst to the first sc worked in this round. ch1. 

Round 5 (Coral) - ch1. in next chain space, [sc, hdc, 3dc in next st, hdc, sc, ch1]. repeat [] around, joining to first sc with slst. ch1. 

Round 6 (Coral) - sc in each stitch around, including the ch1 space. finish off.

Round 7 (Papaya) - join with sc in blo of the stitch after the sc in a ch1 space. [hdc, dc, (dc, ch2, dc), hdc, dc, sc, spike dc into top of dc of Round 3 below, sc]. Repeat [] around, skipping final sc on final repeat. slst to first sc to join, ch1. 

Round 8 (Papaya) - sc in each stitch, with 3sc in ch2sp at the point of each petal. join to first sc with slst and finish off.

Round 9 (Gypsum) - join with sc in centre sc of 3sc worked into a ch2sp of Round 7. [sc, hdc in next 2st, dc in next 2st, tr, dc in next 2st, hdc in next 2st, sc in next 2st] repeat [] around, omitting final sc on final repeat and join with slst to first sc. ch1. 

Round 10 (Gypsum) - [dc in next 3st, 2dc in next st] around, but do 3dc in the final stitch not 2. Join with slst to first dc. ch1. 

Round 11 (Gypsum) -  [sc in next 3st, hdc in next 3 st, dc in next 3st, (2tr, ch2, 2tr) in next st, dc in next 3st, hdc in next 3st, sc in next 3 st] repeat [ ] around and join to first sc with slst. ch1.

Round 12 (Gypsum) - sc in each stitch around, working 3sc in the corner ch2 space. finish off and stitch in ends! 

Sunday, 22 May 2022

Stylecraft Blogstars Garden Party!

Hi everyone!

It's been an age - racing around after tiny people certainly doesn't allow much time for blogging, or crafting, or... well, pretty much anything else. Allie is 4 years old today, and the time has absolutely flown! 


We were so excited when Stylecraft and the Blogstars suggested a Garden Party for the Queen's Platinum Jubilee this year - we hope you visited JosieKitten's blog for her gorgeous Macaron circular cushion pattern on Friday! 

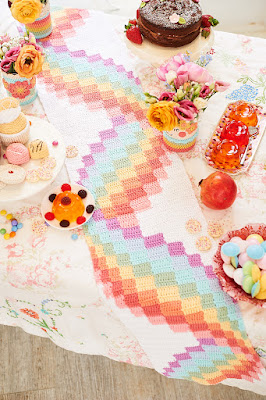
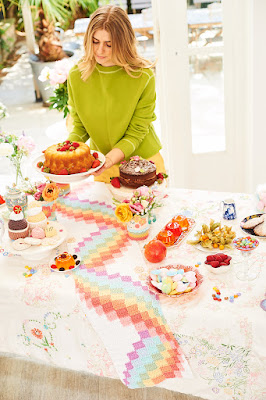
The Garden Party concept was just the creative spark we needed to put together a new design in our Bargello series. This is our Bargello Ribbon Table Runner (all photos in this post credit to Stylecraft Yarns and their amazing photography and design team). 

I've had this design mumbling around in the back of my head for ages, but just haven't had time to activate my almonds and get it out of the brain and into some yarn. It's based on a quilted bargello table runner that my mum has in a glorious patchwork pattern book, but in a pastel rainbow. I love the illusion of the ribbon twisting around itself up your table!

As with our existing bargello patterns, I'm not going to lie - the style of writing the pattern is a bit strange. Please know that I tried as many different ways of writing the pattern as I could think of, and this was the clearest! I encourage you to read it all (even the boring introduction bit), and watch the videos linked in the pattern, and always reach out (on social media, or by email to wrappedwithlovebymichelle@gmail.com is more reliable than commenting here) if you need a hand to get going. The pattern has been tested by three crocheters of varying skill levels, and the text independently reviewed. 


A plus for purchasers between now and December 31, 2022 - US$2.50 (over half the purchase price after fees) will be donated to The Rotary Foundation's End Polio Now campaign. Rotary has been working to defeat polio for over 35 years now, and worldwide cases have reduced by 99.9% in that time. There are only two countries now where polio is endemic, and ever decreasing numbers of wild polio cases in the world. As a proud Rotarian, I'm honoured to be able to support this very worthy cause. We are THIS CLOSE to ending the scourge of polio worldwide.


And now, the pattern! To view or purchase the pattern on Ravelry, go here:


https://www.ravelry.com/patterns/library/bargello-ribbon-table-runner


Keep bloghopping on 24 May to Janie Crow, who has created some really special decorations for our Garden Party!  

Monday, 9 November 2020

PATTERN: Queen Bargello Wave Bedspread AND Bargello Blocks Throw!

Hi everyone! 

Obligatory acknowledgement here that I've been terrible at blogging consistently again, along with vague intention to do better in the future... 

This year has just been bananas for everyone! Hot tip: International Student Exchange and Regional Human Resources Consulting are NOT relaxing industries to work in during a global pandemic, 0/10 do not recommend. The jobs themselves are fascinating and interesting, but after the constant tsunamis of feelings coming at me for months on end, the idea of doing anything constructive other than staring at the wall has been too much to contemplate.

However, I have made progress on my goal of getting written/designed patterns actually up there and published this year, and today is one of those red letter days!

In August, I finally published (to no announcement and fanfare) my Impossible Hexagon Sweater and Cardigan patterns, which I'll blog about another day (but here are the links to the patterns if you want to have a look:

Impossible Hexagon Sweater

Impossible Hexagon Cardigan)

But, to today's news!

After the success of our Bargello Wave Baby Blanket, we decided to try and figure out how to make a bigger version that didn't lean even harder to the right, and by goodness we cracked it! Today I can share with you not one, but TWO larger bargello blanket patterns! Both of these test beauties were made by my partner in crochet crime Anne, and I'm sure you'll agree she's done an outstanding job.


BARGELLO BLOCKS THROW

Pattern Link: https://www.ravelry.com/patterns/library/bargello-blocks-throw 


This design is worked corner to corner using a unique block method, along with the classic bargello style of maintaining the same block height whilst changing the width of each column of blocks. This is what creates the wave effect! Anne took her test blanket to the beach and my jaw literally dropped when the photos came in.


QUEEN BARGELLO WAVE BEDSPREAD

Pattern Link: https://www.ravelry.com/patterns/library/queen-bargello-wave-bedspread


The bedspread is a massive 210cm square (unblocked) to fit your queen size bed, and is made with larger blocks and two strands of yarn held together. 


If you love both of these patterns, for the next two weeks 
(until Saturday 21 November), 
put both patterns in your Ravelry cart and use the code

UNDULATE

to get a discount! 

Sunday, 30 September 2018

Stylecraft Blogstar Tour 2018: Stacking Hexagon Baskets

Welcome to Crochet Between Worlds for the Stylecraft Blogstar Tour! 

This year's Blogstar Tour yarn is Bellissima which came out earlier this month. Man, we are in love (and we are not obliged to say so!!) - it is incredibly soft and lovely to work with. It is effectively the grown up version of the Bambino yarn we made Michelle's baby blanket out of! 


So when we were asked to design a pattern with the yarn, we were very happy to do so! Unfortunately this year, we are both incredible busy during the Blogtour (and before) with life, so please bear with us if there aren't super fancy tutorials and pictures. We do have good excuses though (we think): Michelle has a newborn at home and Anne just moved country from Germany to the Netherlands last week!


The pack we used for our design is called Autumn Leaves (scroll down for a chance to win this pack!). It contains five colors and a skein has 100 grams. 


If you follow our blog, you know that we dislike sewing. And we love useful and easy things. Combining these "features" the Stacking Hexagon Baskets were born. They can we used for everything really... a bread basket, a toy basket or whatever tickles your fancy. When not used, they can easily stacked into each other, so they won't be space eaters. We hope you like them as much as we do!


Want to win a Autumn Leaves Yarn Pack to make these baskets? The giveaway is open until 10am GMT tomorrow! The giveaway is run by Stylecraft yarns.

a Rafflecopter giveaway


Tomorrow the Blogtour will stop at Cherry Heart

Make sure not to miss out on the other Blogstars' patterns (and more chances to win yarn). The tour will run for quite a few more days.

You can visit their blogs here: Crystals and CrochetGet Knotted Yarn CraftEvery Trick on the HookZooty OwlLucia's Fig TreeCherry HeartHand Knitted ThingsJosiekittenThe Twisted YarnAnnaboo's HouseCrafternoon TreatsThe Patchwork HeartEmma Varnam Jane Crowfoot and Catherine's Crochet Corner.

Anyway without further ado.... the Stacking Hexagon Baskets!

---------------------------------------------------
FREE PATTERN: Stacking Hexagon Baskets
---------------------------------------------------

Queue and favourite on Ravelry here: 
https://www.ravelry.com/patterns/library/stacking-hexagon-baskets


Materials:

5 balls of Stylecraft Bellissima or other 8 ply yarn
4mm hook
scissors
yarn needle

Stitches:
US terminology

st – stitch
slst – slip stitch
ch – chain
dc – double crochet

Notes:

1. Use the same pattern for all 4 baskets - just add rows to each hexagon to make each consecutive basket bigger: 

  • Basket 1 - 4 rows
  • Basket 2 - 6 rows
  • Basket 3 - 8 rows
  • Basket 4 - 10 rows. 
There is enough yarn to make another 4 row basket, possibly 6 rows depending on your colour choices. The size 8 and 10 baskets are real yarn eaters - they look very innocent but man they are hungry! 

2. The first three hexagons of each basket are made in Colour A, and the second three in Colour B.


JAYG INSTRUCTIONS

Basically, the joining method is to drop the loop from your hook, insert your hook front to back through the top two loops of the corresponding dc on the adjacent hexagon, pick up the loop again and pull it through. 

For joining to one corner: After the first dc in a corner chain space, Ch1, drop loop from your hook, insert hook front to back through the chain space you want to join to, pick up the loop again and pull it through. Ch1. continue with the second dc in the corner space.

For joining to two corners: After the join to the final dc, ch1, drop loop from your hook, insert hook front to back through the first corner chain space you want to join to, pick up the loop again and pull it through. Ch1, drop loop from your hook, insert hook front to back through the second corner chain space you want to join to, pick up the loop again and pull it through. Ch1, continue with the second dc in the corner space. 

I've had another go at a brief tutorial video - I hope it helps! 


PATTERN

Start with a magic circle

Row 1: ch5, (2dc, 2ch) 5 times, dc, join to 3rd of ch5 with slst.


Row 2: slst into chain space, (ch5, dc into same chain space). *dc in each dc, (dc, ch2, dc) into chain space.* Repeat * to *, omitting last dc on final corner. slst to 3rd of ch5 with slst to close.

Hexagon 1:
Repeat Row 2 until the hexagon is the correct number of rows. 


Hexagon 2:
Repeat Row 2 until you are one row short of the correct number of rows. On the final row, JAYG to Hexagon 1 on two sides.


Hexagon 3:
Repeat Row 2 until you are one row short of the correct number of rows. On the final row, JAYG to Hexagons 1 and 2 on 4 sides.


Hexagon 4:
Repeat Row 2 until you are one row short of the correct number of rows. On the final row, JAYG to Hexagons 1 and 2 on 2 sides.


Hexagon 5:
Repeat Row 2 until you are one row short of the correct number of rows. On the final row, JAYG to Hexagons 2, 3 and 4 on 4 sides.


Hexagon 6:
Repeat Row 2 until you are one row short of the correct number of rows. On the final row, JAYG to Hexagons 1, 3, 4 and 5 on ALL sides.

(The giveaway is run by Stylecraft Yarns, so this makes this a sponsored post. Please note that even though we are Stylecraft Blogstars, we are not obliged to say anything nice or bad about the yarns - we can share our opinions freely and we aren't compensated monetary in any way).