
Part Three of the Carousel Crochet-Along, designed by Sue Pinner and hosted by Stylecraft Yarns has just been posted, and is available to download NOW from the Stylecraft website, in English (US and UK), German and Dutch.


If you haven't set up a Ravelry project yet, the pattern page can be found here: http://www.ravelry.com/patterns/library/carousel-cal
We are working the CAL along with you all (Anne in the new Batik yarn, and Michelle in Special DK, and will post our tips and tricks for each part at the same time as the pattern is published over at the Stylecraft website. Anne is still catching up after her holidays :)
Please feel free to ask any questions in the comments or on our Facebook page (https://www.facebook.com/crochetbetweenworlds/) - we are here to help you. Anne is doing the German translations for the CAL again, so ask away in German too!
Part Three, the Pentagons:
Note: All the below tips use US terminology.
Our top tips for the Pentagons are:
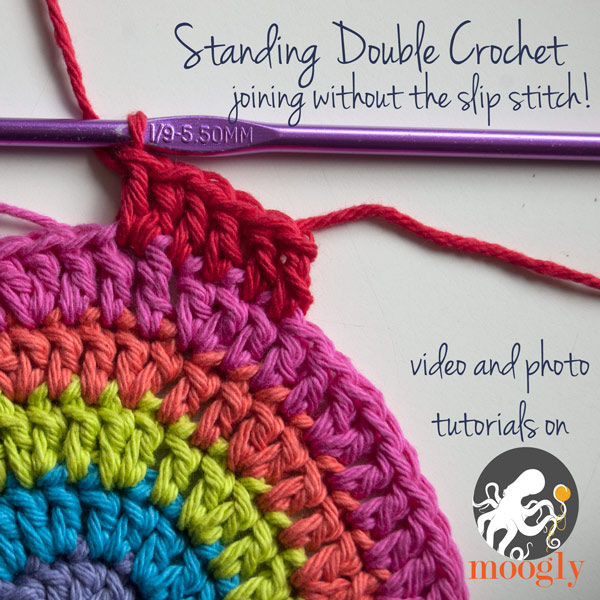
1. Yep, I'm recommending standing stitches again!
For these cute little pentagons, you'll mostly need the joining standing stitch rather than the stacked one, as you change colour for each row.
Standing dc (US) or tr (UK) tutorial by Moogly
2. Finding the colour lists hard to follow? I've made a handy table for the colours of each row for each pentagon, in both yarn types, that you can download here:

Part 3 - Pentagons - Special DK
Part 3 - Pentagons - Batik DK

Part 3 - Pentagons - Special DK
Part 3 - Pentagons - Batik DK
If you're using other colours, you can download the Word doc tables and find/replace with your colour plan here:
Part 3 - Pentagons - Word Doc (both yarns)
3. To keep track of colours whilst working a round at a time on each pentagon (so if you prefer to do all the Round 2, then all the Round 3, etc), pin a little piece of paper with the pentagon number into the centre of each piece! You can then leave the pinned paper attached to the middle for as long as you like - as you can see in my finished picture at the top of this post, I left them on until all were joined in.

I used sewing pins because I like to live dangerously, but it would probably be safer and less owwie if you used little safety pins.
4. Join Pentagon 1 to a Cream band! Then, as you go around, you'll be joining the Cream pentagon to a Lipstick/Cherry band, and the Lipstick/Cherry pentagon to a Cream band :)
5. The Join As You Go method of joining is fabulous - no sewing! In case you're not experienced in this yet (and you will be by the end of this beautiful Carousel), here's what I did, which might help you.
NOTE: THESE TIPS MIGHT BE A BIT DIFFERENT TO WHAT BABS DOES IN THE VIDEO AND MAGGIE DOES IN THE CHARTS. It's up to you how you want to do the joining.
First Pentagon - The instructions are lovely and detailed for this first join, you shouldn't need any help from me!
Second - Fifteenth Pentagons
Side 2, First Joined Corner: after the dc in the corner space of the pentagon you're doing the final round of (we will call this PentagonA), do ch1, then slst into the corner space of the pentagon you're joining to (PentagonB from here on). Ch1 again, then do your second dc into PentagonA. (slst into corresponding dc of PentagonB, dc into next st of PentagonA) to the end of the row, and then slst into the second last dc of PentagonB, dc into corner space of PentagonA, slst into last dc of PentagonB.
Side 3, Second Joined Corner: slst into corner space of PentagonB, ch1, slst into first st of banding strip.

dc again in corner space of PentagonA, then (slst into next dc of banding strip, dc into next dc of PentagonA) to the end of the row.

dc into the corner space of Pentagon A, slst to the last st of the banding strip, ch2.

Then, continue finishing off the last row of your pentagon as normal :)
Sixteenth Pentagon
Side 2, First Joined Corner: same as above.
Side 3, Second Joined Corner: same as above.
Side 4, Third Joined Corner: dc into corner space of PentagonA, slst to the last st of the banding strip, ch1.

Then, slst to the corner space of the first pentagon you joined (We'll call this PentagonC for ease of reference). dc into the PentagonA corner space again, slst to the first dc of PentagonC. (dc into next st of PentagonA, slst into next st of PentagonC) to end of row.

Side 5, Fourth Joined Corner: dc into corner space of PentagonA, slst to the last st of the row of PentagonC. ch1, slst into corner space of PentagonC, ch1, then finish off the last row of PentagonA as normal.
We hope these tips help you!
Check back here in two weeks on Tuesday 18 October for Part Four - the Shaped Hexagons :)
The batik file is the dk reg colors
ReplyDeleteGood catch Kelly! The links now go to the correct files :)
DeleteThanks so much for these instructions and pictures - very helpful to someone who hasn't joined 'as you go' before!
ReplyDeleteI'm glad it's helpful :)
DeleteEvery time I see your tips and progress photos on your CALs I want to join in so much - there is always more to learn by doing...but I am snowed under with a bunch of crochet things that are making slow progress.
ReplyDeleteYour CAL posts are certainly very useful. Even for people like me who have not committed to the project, your photos and details are great food for thought. Thank you for the time and effort taken to give a lovely helping hand to the rest of us. :-)
Thanks Jodie! I try to think of things that would have been helpful for me to know in advance, or techniques that I used when making each part :)
DeleteLove your tips. Please can you tell me how you finish each round on pentagon do you just slip stitch to finish then weave in
ReplyDeleteHi Moira! That's exactly what I do :)
Delete